Welcome to Astroboden!
Astroboden was built during 2018 and came to life on facebook and instagram as: Astroboden. In late 2019 it also appeared on YouTube under the same name.
Astroboden is now located southeast of Gothenburg.
Combining a access to civilization with a still fairly dark sky one may enjoy both!
News !!!

I’m absolutely amazed!
First light is always a bit scary.
Things are rarely good right out the box. The ASI2600MC duo was an exception. That worked really well just out the box.
n this case:
first colimitation, which hopefully just require a verification on the mount.
Then it’s backfocus. I just set it up and hope for the best. I was prepped up with spacers to do adjustments between targets if need be.
Night#1
After a set up I took aim for the Rosette nebula like before.
Let’s compare apples and oranges. Because that’s what these telescopes are.
Jezz, sure I have to work on the back focus, but this sucks in light. The big ass opening also gets any stray light in, and I had to put some screen to block the light out.
I took a solid stab at the Rosette nebula, but it’s only so long before it is occulted by trees. Most of the first part of the evening was setting up and fixing stuff, but the result was quite encouraging.
After this I went off to a target that is just over the tree tops. The monkey head nebula. Now, some 40 frames just pours in.
Night#2
I started off again with the Rosette just to give last night some closure. Drunk of excitement, and some good ol´rum, I picked the next target pretty close to the monkey head from yesterday:
The Jellyfish nebula. I have tried it before, but with very sad result. Walking noise and other issues.
I’d like to say that experience and technique is key. Sure that’s improved, but I can give the credit to equipment as well.
With only 2 minute exposures the results are amazing.
During the two nights I had it out for testing it really blew my little mind away.
This will change a lot! I will have to revisit every single target I’ve done.
Every nebula.
This is not all, I actually did a lot more these first three days, but the first two will have to do for this video.
It’s enough. And plenty to come.
I also tried with the filter off for a couple targets.
That’s also for next time.This is pretty much just first impressions and it will be interesting to see what the opinion is after longer use.
Is it a beginner telescope? No, really not.
There is a lot that’s still not right, and some would perhaps scare beginners, with good reason.
The Purrrrrfect astrograph - Unboxing
We didn’t do an unboxing for the ASI2600MC duo, but we get another shot!
As I moved to an area with a much more broken horizon, there will not be many long consecutive imaging sessions.
And I’m a tourist. An astro-tourist.
I love to visit objects in the night sky.
Take the money shot. Buy the t-shirt. And be off to somewhere else.
I don’t mind make it a full night if I can, but I have historically not been revisiting the same place for building a project in any meaningful sense. It’s mostly been with some new equipment etc.
With a great new camera, I now need a good telescope to support my tourist journey around the sky. I need it to be a fast telescope to get as much light as possible, in as short time as possible, so I can catch the buss to the next attraction.
Luckily there are solutions for people like me. They come in different names.
The solutions I have been set on till this point are:
1) Starizona’s “Hyperstar” lens assembly. This will turn my F/10@2032mm EdgeHD from Celestron to an F/1,9@390mm. Sounds magical. The price for this is almost the same as a new telescope, and I will not be able to use the high focal SCT since it’s now a low F/1,9 astrograph.
2) The second option is to get a new telescope. The RASA has here been my only real option with F/2 it’s pretty much the same as the Hyperstar, but as a separate telescope I can still use my SCT for something else. Now that I have everything else I need for 2 setup.
The bad thing with the RASA is that it has a very small image circle, of about 22mm and a usable field, for guiding etc but not necessarily “flat” of 32mm. This might be possible for the APS-C sensor, with coma in the corners.
The other “but” is that the backfocus is very short, 25mm from M42 adaptor, or 29mm from threaded collar.With the camera consuming 17,5 or 22,5 mm this leaves very little left for filters and other adaptors.
All in all, I decided that the RASA or hyperstar solutions was too close to my fresh, new camera and decided to wait.
Then I stumbled over another solution. Or maybe it found me. Most likely algorithm matched us up.
Credit is where credit’s due.
A Newtonian Astrograph with an F/2.8!
Only 150mm aperture felt a bit small at first, but focal length is just what I want and then it’s just math really.
Price is about the same as a RASA, but backfocus is 55mm and the image circle is about 44mm which leaves plenty of space for future upgrades (NO, no more upgrades!!!)
So, here we are. Unboxing a new telescope.
I also got ZWO EAF autofocuser and a laser collimator from TS optics.
In the video below we’ll be unboxing, admiring the sight of a brand new telescope, mount the EAF and check the collimation.
New Horizons!
The autumn has been busy. Very busy.
And not with much astronomy related stuff.
There has been some work on the Lucid Mount over the summer, making it quiet as a mouse, but not much more.
The biggest update however is that I, and Astroboden is moving.
The farm is sold and we’re relocating to a new place.
The new place is much smaller, but closer to work.
have made efforts to find a place with astrophotography as deciding factor, but the time we live in is not the best.
We’ll have to make do with what we find possible.
The first idea was also to bring some of the mighty ducks with me, but moving into a small property with farm animals is just not right. Maybe one day, when the roots have set and if it feels right, I can get another little crew of Indian running ducks. This gang on the other hand, has got the best home imaginable.
They are loving it. And that’s all that matters.
For this episode, which will be the last one from the old farm, I test out the Lucid Mount after some summer hardware upgrades.
The noise from the old system was deafening, and with closer to neighbors in the future, it had to be dealt with.
The new rig really quiet.
Remains to see if holds up for astrophotography.
We’ll also go for a quick little tour of the new site, and what challenges or opportunities it might bring.New times on the horizon.
Full steam ahead!
May the dark side be with us!

The Bubble Nebula!
Perhaps the last DSO session for the spring season.
Let's make it pop!I imaged the Bubble nebula a few years ago, with the old Nikon D7000 DSLR, about the same time of the year.
Sounds just right to pay it another visit.
This time with new kit, and hopefully some experience.
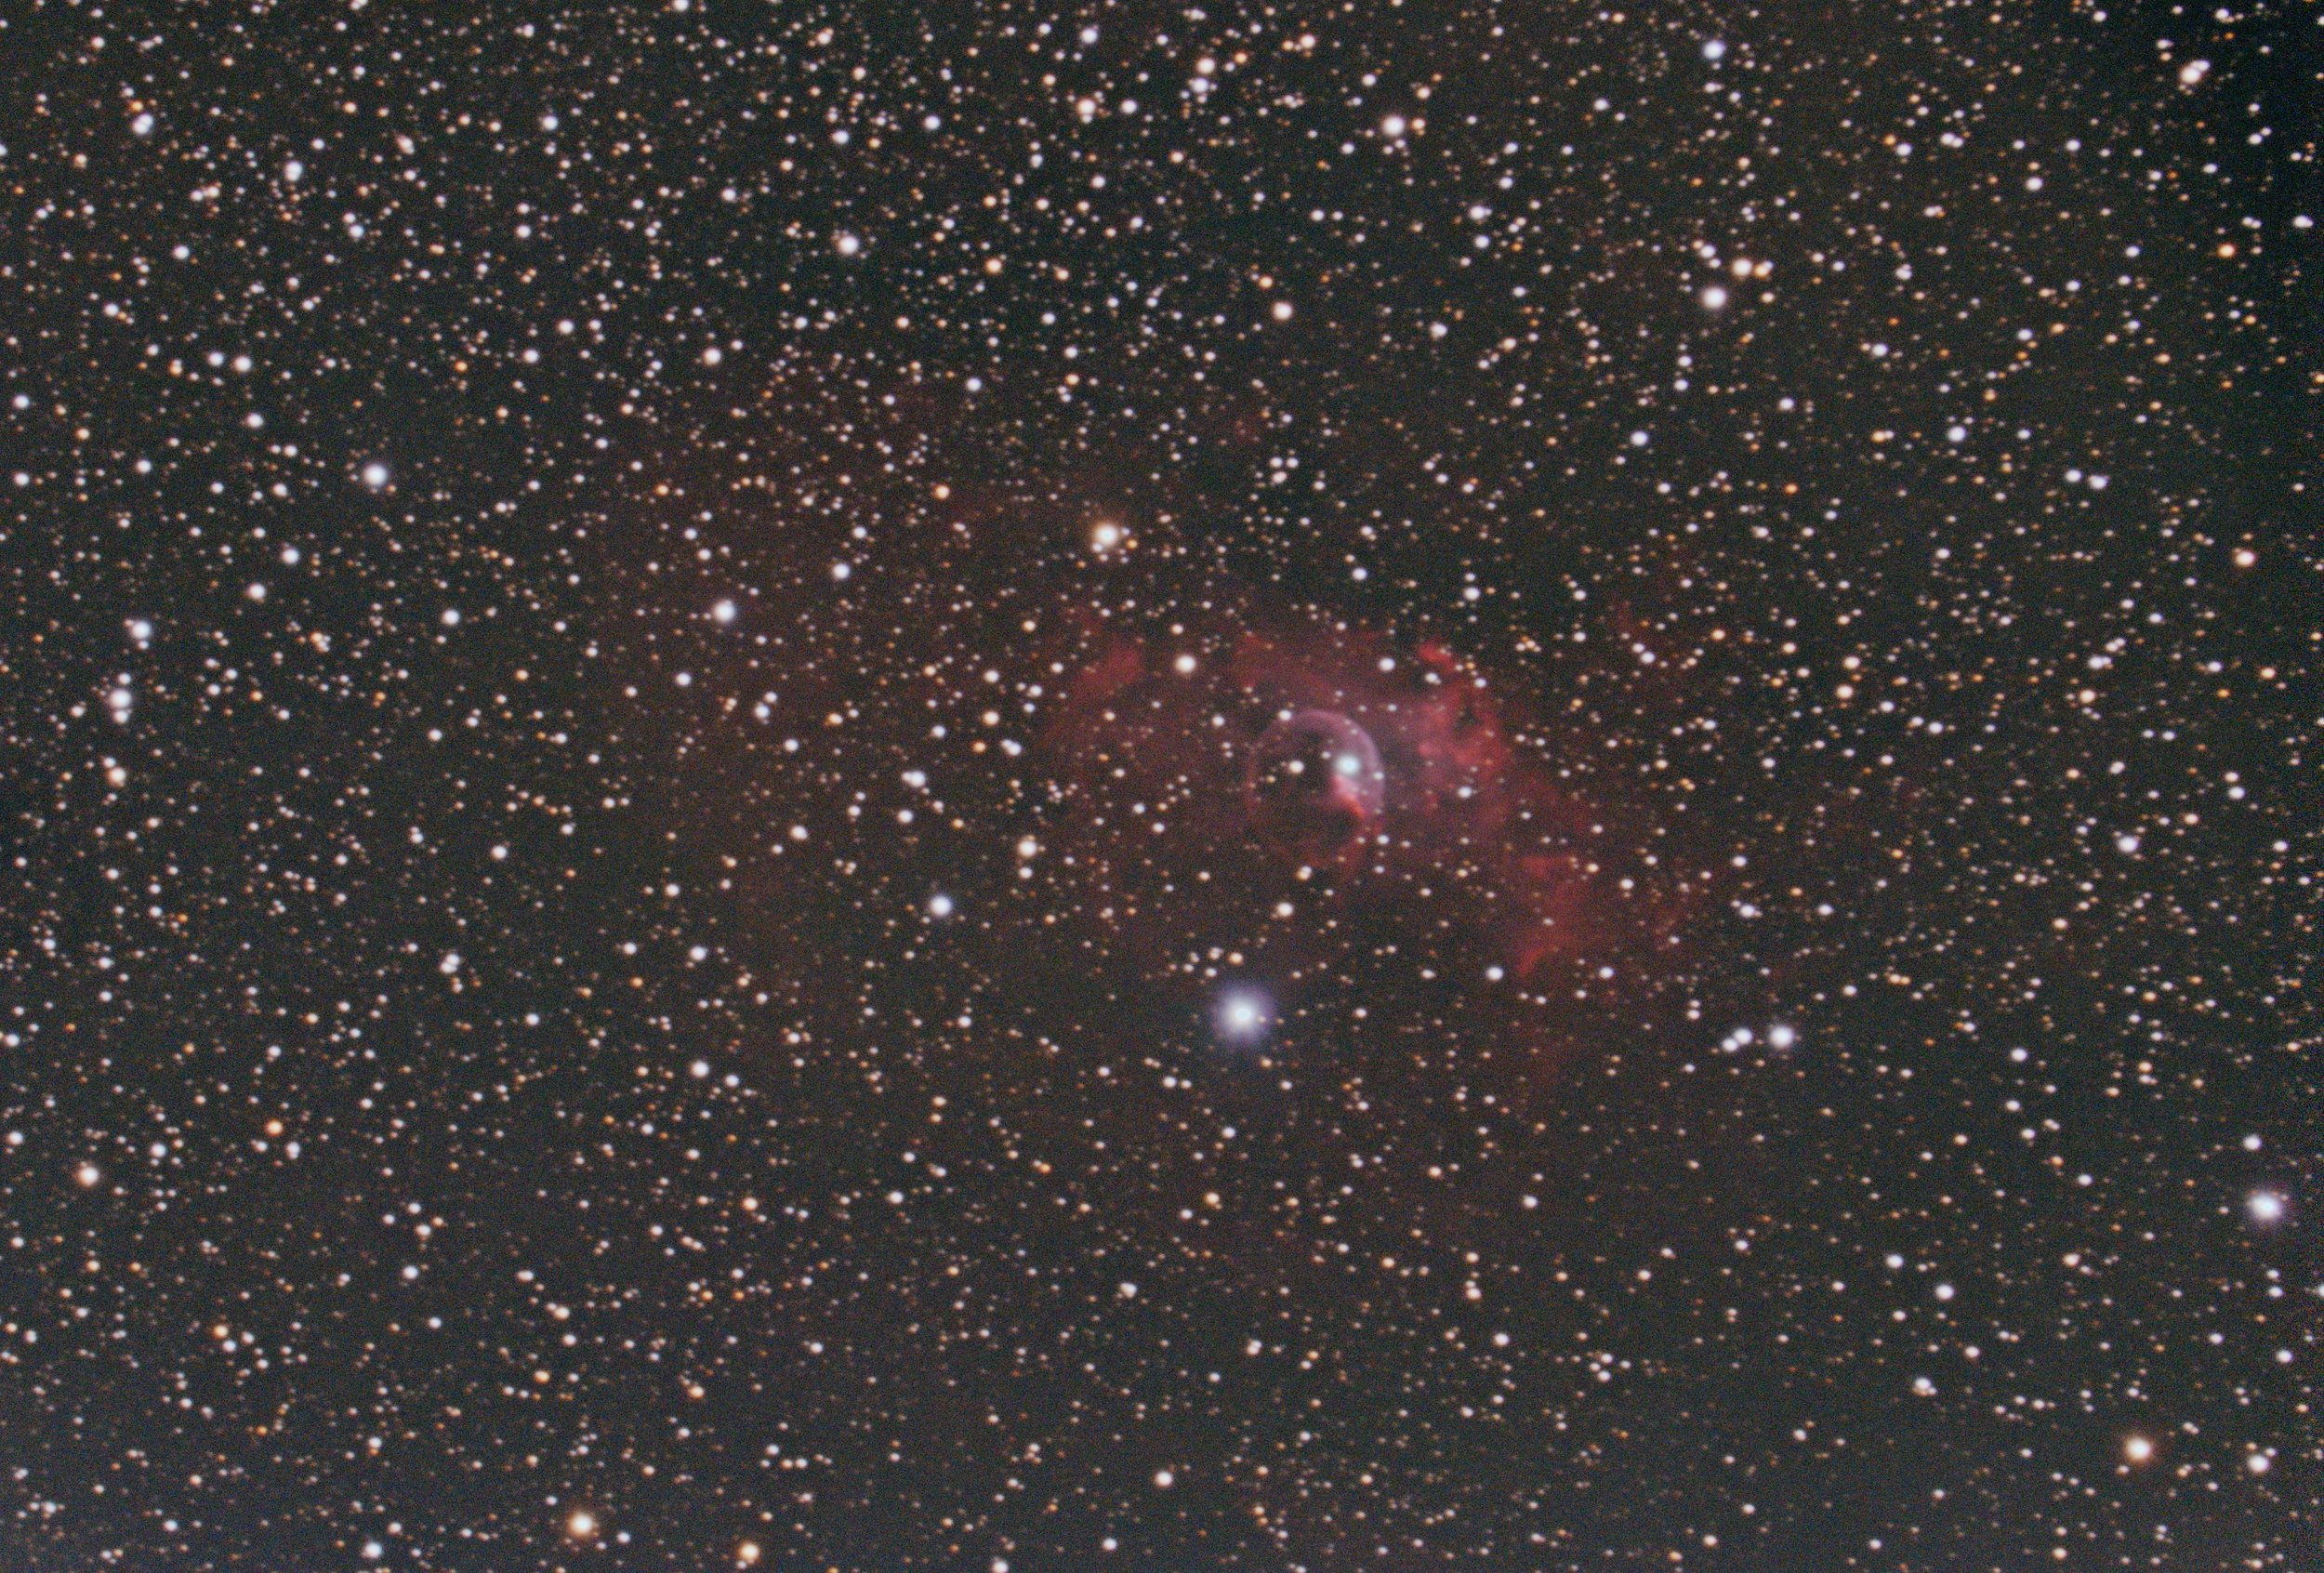
The bubble nebula is a Ha rich region in Cassiopeia where the solar wind from a hot, young star, SAO20575, is pushing out a cloud of molecular gas like a shell around it.
The star is also heating the gas so that it starts emitting light, forming a emission nebula.
The Iris Nebula!
A pretty reflection nebula quite close to the north celestial pole. I have tried it before, but never has the result been satisfying.
To be frank, I think I have tried it about the same silly time of year before as well.
It’s a blue reflection nebula. Not optimal when the sky is bright from that almost-never-setting-sun.
Were just spending time under the stars. Let’s see what we make of it?
I still suffer from an annoying drift caused by miss-alignment between the main OTA and the guide scope. This limits the exposures to 120s. We’ll deal with this in the autumn.

The fireworks galaxy!
Summer is really tightening its grip on the fragile night sky. Maybe we can get one, or a few more nights before autumn.
Based on the location in the sky, that is clear of obstructions, and when darkness is best, I found myself picking targets around Cygnus.
One target that I have been thinking of for a while is the Fireworks galaxy. It’s been in view on one occasion, but I never given it night of imagining.
It’s located on the border between the constellations Cepheus and Cygnus, just in the region I’m aiming at.
Don’t expect a firework at first test exposure! Many, brighter galaxies is much easier to make out in a test exposure of a few seconds. If it wasn’t for the plate solving I might still be looking for it!
But don’t think twice about finding and imaging this target! It is truly a nice little galaxy, bursting with Ha regions, which I really need to go back and image again to get.
Still limited by misalignment between the main OTA and the guide scope I’m doing 2min exposures. I think this would do better with longer exposures, but then we have a reason to go back next season, when the OAG hopefully is installed again.
In the end we got about 30 frames in each color. Enough for a pretty little tourist shot.
A taster for a future project!
The Sunflower Galaxy
Maybe not the most pictured galaxy, but it’s one of my favourites. I love the contrasts with dark dust and Ha rich regions in the galaxy.
I really need to get more Ha on this target at some point.
That will be a task for the winter. There will be many narrow band complementing sessions for different targets ahead.
Anyway. The struggle at the moment seems to be the non-alignment of the guide scope and the main OTA. Just another reason to dust off the OAG again. I just never got friends with it together with the ASI1600.
Must just be in my head, but that’s where most issues are, right??
I deal with it by only doing 120s subs and that is ok for now. There is a whole summer to deal with equipment just ahead of us.
We’ll look at the combined result from two evenings adding up to almost 7h of data. That’s almost a record for a astro-tourist like myself.
Yes, I’m a tourist. Just making small visits to targets, sometimes many different in one night.
Some do say the only way is to keep collecting data till you have no more space on your drive, THEN process it.
That’s admirable, but I’ll do that when I have browsed around the sky like charter tourist with a bucket list. Then I’ll revisit and get down and dirty with the objects.
The Needle galaxy!
I’ll just toss out the +50kg rig and get going. Days of astronomical night is counted and we must make the best of it!
For a few days I’m struggling with image drift due to slight(very slight in my humble opinion) misalignment between the guide scope and the main OTA.
Spite “wonderful” guiding of <1” rms the object still have a steady drift through the image.
The polar alignment also shows to be around or even below 1’, which should be great.
The OAG solves this instantly, but I’m having issues, so I’m just dealing with it by lowering the exposure to 2min.
It seems fine. Make the best of it, right? I’ll deal with this in the autumn.
You’ll also see my slightly tacky Go-To replacement strategy, by plate solving using astrometry.net’s online plate solving.
You can do it in ekos as well, I know, but then I must enter a crude position manually.
This just works. It can also be used for any equipment.
As long as you can grab the image and upload it in a browser.
Go-To etc is also on the to-do list...
Supernova SN2023ixf in the Pinwheel galaxy!
Everyone is doing it, so I thought I’d just break my summer hibernation, and pop the Lucid mount outside for some quick action.
With a sky that is bright enough to shine your way home from the pub, there is just no prospect of getting an image that stands out.
We're just doing it for the supernova. And just expecting a bright, dot star where there were none before.
Very simple. Just the way we like it.
Lucid Mount <3 Big Bertha
We did it some 2 years ago. Then me and Balti imaged the Whirlpool galaxy with the 500mm refractor followed by a session using “Big Bertha”, the 8”/ 2032mm(reduced to 1422mm) SCT.
The mount was the Lucidmount Mk1, and although it worked surprisingly well, it was a bit hard to repeat as it was far too sensitive to wind etc. I just gave up the whole thing for some time.
Now it's time again on the Lucidmount Mk3, hopefully with enough muscle to handle it.
We’ll start out by imaging the Pinwheel galaxy - M101, with the refractor and then bring it all into the shop and change things. We don’t just have to change the OTA on the mount with all things associated with this, we also have to work out the back focus. Again.
I say, when I get this done good, there will be a note posted on the board (sure there is one floating around the shop here already…) of what the spacing should be!
After trying it out I decided to change the whole thing again however and mounted the Evoguide scope from skywatcher instead of the OAG. It was just easier to get going with more stars to pick and choose from. Maybe I’ll get back on it later.
Enjoy, and may the dark side be with you!
StellarMate OS <3 Lucidmount
I just stared to get over the hurdle of carrying my laptop out for my polar alignment.
The result made it well worth it, but still, obstacles are to overcome.
A follower and friend online advised me to try out StellarMate for guide computer. Or StellarMate OS rather, since they have the Operative system available for purchase as a download.
I was a bit reluctant at first since I wanted the computer to other, computer-stuff.
Like run Arduino-IDE, python, etc. But I decided to give it a chance.
A while back we had a storm coming through, and in the wake after it a clear and almost still night gave us a chance to test the system.
Starting at Orion for a few hours.
The polar alignment tool worked just fine and so did the multistar guiding. I just could not walk away.
Only when Cygnus, and the Crescent Nebula was rising in the north east, me and Balti was allowed to get some shuteye.
The Skull... Rosette nebula!
While waiting for the comet, C/2022 E3, to get in position last time, I spent the night imaging the Rosette nebula. I've tried it a few times, but things have always gone wrong.
I thought poor guiding ruined the show this ti was as well. Seems like things worked out anyway. It's not the best data, and it's never enough, but with the assistance of processing tools, I think we pulled out ok.
The evening and some glimpses from the processing can be followed on Youtube as usual:
Comet C/2022 E3 (ZTF)!
This is a first! Never really imaged a comet before. There's alot more to it if one really want to get a good image. Maybe I'll get some more shots before it heads back to the cold again.
10x30s R+G+B, 20 Dark, 20 flats
Guided on stars.
A few nights after I gave it another shot.
High on confidence since last time I thought it was a walk in the park. Looking forward to breaking the Internet with my mad comet imagining skills.
I did a session on the Rosette nebula during the evening and was to shoot the comet before derigging.
I soon noticed the difference from a week ago.
That bugger moves! Fast!
Check out the video if you want to see more from the comet chasing!
Enjoy your failures!
Capturing the Tadpoles and the Flaming star
Finally, a break in the bad weather spell we’d been having.
And it’s a complete surprise! All the weather apps where trying to keep me inside, but a crispy cold winter night is just what we’ve been waiting for!
From a couple of previous, bad nights, the rig is now armed with narrow band filters, so that’s what we’re doing.
The target for the evening is set to the Tadpoles in Auriga.
The Flaming Star is also there, but I was keen on the Tadpoles. Guiding wasn’t terrible, but nothing special. I thought to let the images decide if it’s good or bad for ones!
The night held up for much longer than anticipated and after a session on the Tadpoles I could not resist the urge to scooch over and to the Flaming star anyway. It even got the remainder of the evening.
The following day, happy as a clam I rushed onto processing.
The happy clam closed up quite quickly.
There were issues. A visit form an enemy I thought I buried in the past. Sensor tilt!
Moral of the story is:
Enjoy the moment. Fix shit that doesn't fall off and enjoy the next great moment.
That’s enough wisdom from me.
Almost…
- May the dark side be with you!
QHYCCD Polemaster
First impression & shooting the Pleiades
I have been having some issues with polar alignment using the polar scope on the Lucid Mount.
Alignment is usually +10’, but it’s not uncommon with an error of closer to 40' - 1 degree.
Most likely there is some issues with getting the polar scope arm square…
Thanks to my crew of magical animals, this is about to change!
Balti found a mysterious egg with the ducks that contains something wonderful!
- PoleMaster from QHYCCD!
This is a first impression of the device, and we’ll see the quick setup, and when I start an imagining session of the Pleiades – M45 after using the device.
The Lucid Mount Mk3
First light of the Andromeda Galaxy
So, I just upgraded the DEC motor to the same, whooping 2kW motor I previously installed on the RA axis.
I just couldn’t help myself when I found another one.
My direct drive DIY project is really coming together now I think.
I hope anyway. Time and testing will tell…
Speaking about testing! All we need to do now is to toss the stuff outside, without breaking my back, a leg, my delicate self-esteem if the stuff doesn’t work as intended.
I found a very nice lifting sling that worked great as a soft carrying sling. I could carry this around all day now!
Anyway, for a few nights myself, Balti and an army of ducks were prepping the rig and testing the Lucid Mount Mk3 on one of a few targets worthy to be imaged again, again, again and again…
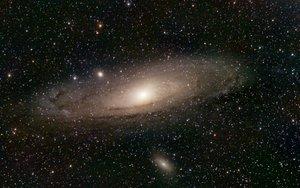
- The Andromeda Galaxy!
Yes! I did try to convince myself to do something else for a night or two, but I did not stray. Very diligent, and a bit boring.
But, now we can hopefully leave our universal neighbour till next year and do something else after this.
This video is about rigging up home built astronomy equipment, look at guide data followed by more rig-up and look at some more guide data, and then do it again.
We are also looking at a final image. Otherwise, I don’t think I could give it a break.
Rapid development! - Lucid Mount Mk3!!
So, I just got the Lucid Mount Mk2 up and running testing was well under way.
The “tiny” 350W DEC was actually not reducing performance jet, at least not in calm conditions, but the benefits of the larger motor are just too great to ignore.
My intension was not to get a stronger DEC motor till I secured the functionality of the RA motor. Sensible, right?
Well, the motor I got are basically e-bike spare parts, so stores generally only have 1 part available, and the lead times has been horrible.
Might have been luck, or my current habit of trolling sites for suitable motors. I suddenly came across an identical motor to the one I got for RA!
I couldn’t pass on the opportunity. Let’s move on and evolve into:
- The Lucid Mount Mk3!
More light captured - The Lucid Mount!
After first light, a few more night came up and offered some opportunities to test things.
The new motor is just amazing. It’s a so strong compared to the other one. With the RA motor holding up better, the DEC motor seems to perform a bit better as well!
Things are starting to look nice, but there is still some tweaking to do.
On the other hand, one motor can easily drag the other one down. Motions transfer easily through the structure.
The chain and the weakest link, and so on…
The Lucid Mount Mk2 has only been operational for a few days and I'm already scetching on changes?
What that is about we’ll get to know later, in this episode we’ll test the mount on everyone’s favourite galaxy:
M31 – The Andromeda Galaxy.
It’s a process that stretches over a few days. Most of it is carrying the stuff outside, and with great excitement looking at guide graphs.
I’m not sure I’ll be able to communicate my enthusiasm, but even though pretty pictures are the end goal, the journey and struggle to get them is the real game.

First Light - Lucid mount - Direct drive DIY Mk2
Last time The Lucid mount received a major upgrade in form of a 2 kW 60V BLDC hub motor for the RA-axis.
The change is amazing!
The shear strength of the motor is humbling in relation to the tiny DEC motor.
I did not dare to wish for it, but a somewhat clear night has arrived!
- Time to literally putt my back into it and carry the rig outside!
This is a first light session, but as such there will be no guarantee on the actual resulting image. There might and probably will be some child-diseases to work through after such an upgrade.
Will the CGX parts that was repurposed survive under the heavy load? Or will it give in and pull this Direct Drive DIY project down with it?
- We'll soon know!
Lucid Mount Mk2 - Fresh update!
I have been working on the “Lucid Mount project" for some time now. There’s been a long break for different other projects, but now it’s time to get back on track!For this a change is needed.
Encoders would help out battling the instability this design suffers, but the fact that these motors are just not strong enough will never be cured by encoders.
The cost of encoders is also quite substantial, not to mention the effort to tune a system to work with them.
- Nah, more muscle is the way out here! 2000W60V will make sense quite soon.We will also find out how some of the CGX mount parts has been given a much greater purpose!It’s a long making-video. Enjoy, or skip around in the chapters till you find something you fancy!
ASI1600 MM Pro - Square Stars?!
First, I need to come clean on the time-line.
I did get the ASI 1600 MM Pro in September for the video not too long ago.
Only it was in September 2021.
Yeah, so I’ve had it for a while now. And it’s good, cause its some getting used to. One-shot-color is just so much easier in the beginning. But, a cooled, dedicated camera adds functionality and features, that quickly makes you hocked. Specially, if you went from a DSLR without streaming, or computer download features.
So, what I did was that I set the Lucid mount to rest for a while and started to rig up at astroboden instead.
I wanted to get to know the camera, and not mix it up with the experimental mount issues.
I have been making a few sessions down here trying to get some targets that I just can’t get to up by the garage.
It was all good and though I have some way to go on both the technical and processing side with the cooled mono camera, it feels like a good camera.
However…
So, I just went from having 3-legged, propeller looking stars to get nice round ones. Halos around bright stars are normal, and can vary depending on the optics etc, but these are now square!!
Very odd and unnatural. We’ll inspect closely on single R, G, B and narrow band to see these effects more obvious, but the luminance layer throws me by surprise!
This is apparently an effect of something called “microlenses”. Didn’t know about them till I tried to figure out what was wrong. And apparently the ASI1600 is known for its issues with these. Now after I find out, I find the comments all around.
Have to work on my research…
This is not a review, just highlight the issue that I found very surprising and didn’t know about. If there are any ways to deal with this, I’m all ears and eager to learn!

Skywatcher Equinox 80ED APO
The first telescope I got was a refractor from Skywatcher.
The Equinox 80ED APO. 500 mm focal length 80mm aperture.
1/f of 6,25 makes it not super fast, but not too slow.
It's their pro series, which sounds awesome. Don't know what makes it pro.It's black and looks cool. And I got it as a demo ex from my "go-to" astronomy shop with a discount so that was a bonus.
It's been good and easy to work with, but we have had some bumps on the road along the way.
The Crayford focuser was not well tuned from start and I had tomake my own, brutal focus holding solution before I got some proper instructions to follow.
There are also some very annoying “propeller” or “tripod” looking shapesaround bright stars that threw me on a ride before I managed to find out whatit was, and able to cure it.
All in all. Very nice and been serving me pretty well. With the issuesironed out, I think we might be able to continue to collect light from afar fora while still.
A leap in evolution!
Astroboden is making a leap in evolution! A change like no other! Or so it feels anyway.I’m getting a new camera. A dedicated (unlike the modified, very much dedicated DSLR…) astrophotography camera! And not just any old camera.
The ASI1600MM Pro.
- A monochrome, cooled camera.
- A streaming camera. Which means that I will be able to get images on my computer straight after the acquisition to inspect and judge if they are framed correctly, focused etc. A bit change from my DSLR where I could not connect it to a computer for any exposures longer than 30s. And the back screen of the camera was just not the best to use for auditing images in the cold winter evenings. Better do that inside in the warmth with a nice beverage at hand.
- Monochrome means that I’ll get ALL the light passed through each filter is registered by the pixels, and not just from the bayer matrix arrangement where a large portion of the light is lost for each pixel because it’s filtered out.
- A cooled camera, will reduce much of the noise from where the sensor is heated up by the readout. The bitter cold -20C evenings here will keep things nice and cold, but this will help. It will also help to keep it at an even temperature. Good for consistency.
I you watch the video below, we’ll enjoy a little unboxing, followed a rig-up of the equipment for the evening on with the camera on the “Lucid Mount”, my home built Direct Drive telescope mount.
The final result is a stack of the images I did collect in red for the evening.
We’ll have to work on this project ahead for a final RGB image of the Andromeda galaxy.
- May the darkness be with you!
Big-Bertha vs the Lucid Mount challenge!
M51 in focus
Balti got his message through.
I have to test “Big-Bertha” on the Lucid mount.
I would die curious if I didn’t.
“Big-Bertha” is my EdgeHD 8” SCT from Celestron.
I’m using a 0.7 reducer on it moving from 2032 mm to 1422mm focal length. At 203.2mm aperture this gives us a speed of f/7.
It's about half the size of the original "Big-Bertha" (42cm German howitzer from WWI), but its a nice light bucket anyway.
Just a bit slower than the Equinox with f/6.25!
The rest of the equipment will be: Nikon D7000, ir-Mod by yours truly OAG with a reducer, by yours truly ;)
ASI120MC guide camera
Last but not least: The Lucid Mount. Self-contained with everything from kstars, PHD2 guiding, etc. Not goto atm, but we’re working on it.
Challenges I anticipate, but not excluding any other, are:
1) Wind/air movement
2) Balancing.
3) Dew
4) Balti’s smug face if it works great.
That last one I will happily deal with.
The target will be M51, the Whirlpool galaxy. Feels like a good thing to do since we just did it with the equinox.
That’s it! - Let’s get Big-Bertha up on the Lucid Mount!
- May the dark side be with you!

Lucid Mount #8 Imagening the Whirlpool galaxy
Using the Lucid Mount!
Let’s do some imagining with the home built direct drive mount!
The project might be summoning clouds however. There seems to be very little clear skies lately. During these we work on things and then get to test all the changes at ones. Wonderful development process and make trouble shooting a dream!
Anyway… I have made changes to the control algorithm, and will be using “sinusoidal-third-harmonic-injection”. The waveform is very similar to the one resulting by space-vector-PWM control. It’s widely used in these sorts of applications so why not.
I’m also trying out to power the rig on batteries rather than my old PC power supply. It can deliver more than enough current, but the switched power supplies can be a bit noisy. The batteries are way more quiet and stabile. I might make a filter to clean the PSU out later on, but tonight I’m testing batteries.
I’m also changing the auto-guide rate from 2x sidereal to 1x. 1x is by default more stabile since the mount never actually changes direction when guiding the tracking RA movement.
Meteorology is still a pseudo-science in my opinion. Right up there with astrology reading tealeaf’s etc. Maybe the general forecasts sucks so much because they are basing it on a flat earth model??
Today it was all for the better though, since I had almost a full night of imagining rather than just an hour or two. Sometimes it’s bound to swing your way, right?
I change the target from M45 to M51 while waiting for clouds to break up pretty much.
I might have to redo the processing later. I’m not too happy, and Balti is not shy to give his honest opinion.
I’ll leave it up to the beholder. We’ll have consider the equipment used is still under development… although now I’m just making excuses.
May the darkness be with you!
Lucid Mount! #7 in the Direct Drive DIY series.
Alright! There is no shame in admitting defeat!
- Ferro fluid was a bad idea. Maybe I’m just using the wrong stuff.
I have now also understood that it’s supposed to be replaced in the e-bikes ones a year or so due to evaporation…
I don’t want to do that, so we’ll look into other solutions.
For anyone new here, I'm making a direct drive astronomical mount using BLDC hub motors from a Hoverboard.
It was going to be some super scientific episodes to come. Temperature graphs etc. We'll do something else.
Also, I did make a video of how the motion was after running the RA motor at 60% duty cycle for a few days. It was not good.
Very sticky and sluggish. That video was lost somewhere in cloud backup space.
Perhaps that’s where the socks go?
Anyway, to illustrate what it looks like inside, I’ll open the motors up for you.
The RA motor has been running the hottest at 60% duty cycle.
One can tell. The DEC motor was running on 40%, did not show any signs of clogging up.
- Active cooling it is!
Lucid Mount! #6 in the Direct Drive DIY series.
Cooling!
What has been desired since we came down from the trees and need a way to keep the beer cold on a summer day.
The Lucid mount is a power-hungry beast that needs to be cooled down as well. I’m pushing the hub motors to their limit in this application and need to find a good way to keep’'em cool.
Keep the smoke inside at all cost.
I’m running the motors at 40% power and need to increase this in some way. Active cooling like fans is an option, but I have a fear that moving parts and an airflow through the motor will generate disturbance.
The secret weapon comes from NASA!
Space technology to save day. Very suitable!
- Ferrofluid! Liquid iron! Heavy Metal!
Developed by NASA as an alternative rocket fuel in space where gravity assisted pumps is not an option.
E-bike sports have been using this for years already. Simply injecting this into the hub-motor and it will orient itself between the magnets and the coils forming a thermal coupling allowing the heat from the stator coils to dissipate through to the case.
There is talk about increased performance of up to 50%!!
Seems like the simplest and coolest(!) solution yet.
What could possibly go wrong?? It’s not a cheap liquid however. It’s around 400€/litre. Luckily one can buy it in smaller quantities and I only need around 5ml/motor of my size.
Let's rock! And may the dark side be with us!
Lucid Mount! #5 in the Direct Drive DIY series.
The Lucid Mount project is still alive!
Just have been busy doing other stuff.
Before the autumn and winter season allows us to get back in business, let’s continue on where we left off.
First off, I figured out a way to test and work on the project without relying on the weather.
After struggling with software and other things I finally got to a setup that was somewhat working. A very noisy setup. But that might actually work.
Filled with optimism I set up my direct drive mount on a concrete pad just off the garage. Balti also get to fend off gremlins that could be the root cause of many guiding issues we’re struggling with.
Better be safe than sorry.
The targets for the night is:
The Pleiades – M45 and The Hercules cluster – M13
Maybe not the most exciting targets, but they were easy to find and to start with. Let’s shoot some targets with the home built direct drive telescope mount!
There will also be a few images taken with the setup:
Lucid Mount
Skywatcher Equinox ED80
Nikon D7000, ir-mod
OAG with 0.7 reduced ASI120mc-s guide camera.
Enjoy, and may the dark side be with you!
Lucid Mount! #4 in the Direct Drive DIY series.
Here we’re trying to design and build a direct drive telescope mount. Ghetto style from scraps. By scraps I mean take other stuff and repurpose for something else. But, what’s scrap anyway? One guy’s trash is another guy’s treasure.
On the note of garbage, the weather this autumn and winter was shit.
If this weather didn’t turn a few from the hobby, I would be surprised. But look! We can all gather around our unused $$$ telescopes and rant about the weather!
I’m happy though. I can now stay inside and work on my DIY projects with a clear conscience! Not wasting any preciouses clear sky time on crappy equipment that I can’t blame anyone else for. On the down side, I can’t test it either…
I’ll pull though the past couple of months in one long episode here. I should really cut these down and make some shorter, bite size episodes. Summer project perhaps.
We’ll see snap shots of the evolution of the Lucid Mount from where we left off to almost where we are today. I’ll leave a little bit for future episodes ;)
The road ahead is long still, so I really don’t need to worry about that though…
There will also be a few images taken with the setup:
Lucid Mount
Skywatcher Equinox ED80
Nikon D7000, ir-mod
OAG with 0.7 reduced ASI120mc-s guide camera.
Enjoy, and may the dark side be with you!
Direct Drive D.I.Y #3
Have to work on some other name for this…
Since the weather offers no room for testing and iteration, I’ll just crack on and make some bold assumptions that all is working beautifully!
I have another motor just lying around here and components to build a second drive circuit. No reason to stop, or slow down now. The rig is still a child made from the forbidden love between a carpenter and an engineer.
What we can find in a hardware store and off some shelf. We’ll start out simple and work our way up.
In the youtube episode linked below we'll also look at why encoders are considered necessary for Direct Drive mounts. It’s quite obvious, but not a path we’ll be joining just yet.
Also, in this episode, there will be actual pictures! Yes! There will be fruit of our labour! A sweet taste of success, however small and easy to accomplish.
The Andromeda Galaxy is good and easy target to start with.
My intension is to keep things short, but I keep missing that target. I’m just too interesting. Can’t cut it down another minute...
Direct Drive #2 StarTracker
Summer/Autumn 2020
Here's the next part in this YouTube series where I’m building my very own Direct Drive Telescope Mount!
I’ll look over the things I need for the build, but also the theory of how to move a BLDC motor smoothly in 1x Sidereal rate.
We're talking about 15/3600° per second. Look at a shadow of about 0,5m length or so (from the sun, otherwise you’ll be standing there for a while) and you’ll get a picture of how quick… eh slow that is.
For this we, unfortunately, need some boring theory.
Thereby the lengthy episode.
Balti makes a keen audience. If you're not, and want to see some build stuff just skip to the last 5 minutes or so.
We have to skip a lot of things when it comes to actual building, design and so on. We’ll get into some more specific stuff in some later episodes. This was long enough.
I started calling my mount "the Lucid Mount". If you want to know why, I guess you just have to watch the video, haha!
Short about the equipment used:
*Motor is a 350W BLDC hub motor from a “hoverboard”.
*Scrap parts from the “hoverboard” to act as motor attachment for the mount.
*Controller is the Teensy 3.2
*Main power switches are made out for MOSFETs and some other components driving these. (One may buy dedicated MOSFET drivers, but I decided I wanted to make my own…)
*Powered by a 6V battery or a 5V power supply. Current draw is about 4-5A.
*Protoboards for fitting components.
*Lunch box for electrical enclosure.
*Polar scope. Got it from an old mount.
*Things from your local hardware store to fit it all together.
*Hot glue.
It is an ongoing project, and it has kept me sane through some bad weather and far too bright nights.
-May the dark side be with you!
Building a Direct Drive Mount! Summer 2020 -
Let’s start a project! A project that will keep us busy through all those rainy days, or nights rather. But why not, a project that will keep us busy whenever we can’t be outside and enjoy the night sky.
A danger is that it might, and probably will, consume some of those nights as well. I’m talking about making our own equipment.
And not just any ol´equipment.
A telescope mount! A
direct drive telescope mount!
A freaking Direct Drive Mount!
Can it be done? Will in simply consume all our time until we have lost all friends and family (except Balti, he´s loyal, man´s best friend for sure).
Join me in my silly quest and the bad weather will not be as bad anymore. The sun can shine, but who case? We’re inside!
At some point the weather must turn around and the problem then is: Can we pry ourselves from the project and actually enjoy the night sky? Is it going to be another horrible piece of equipment that just: “won’t bloody #%&!” work dammit!!”?
This is the intro to a series that describe my journey to build my dream mount. Might turn out a nightmare, but still a dream!
- May the dark side be with you!
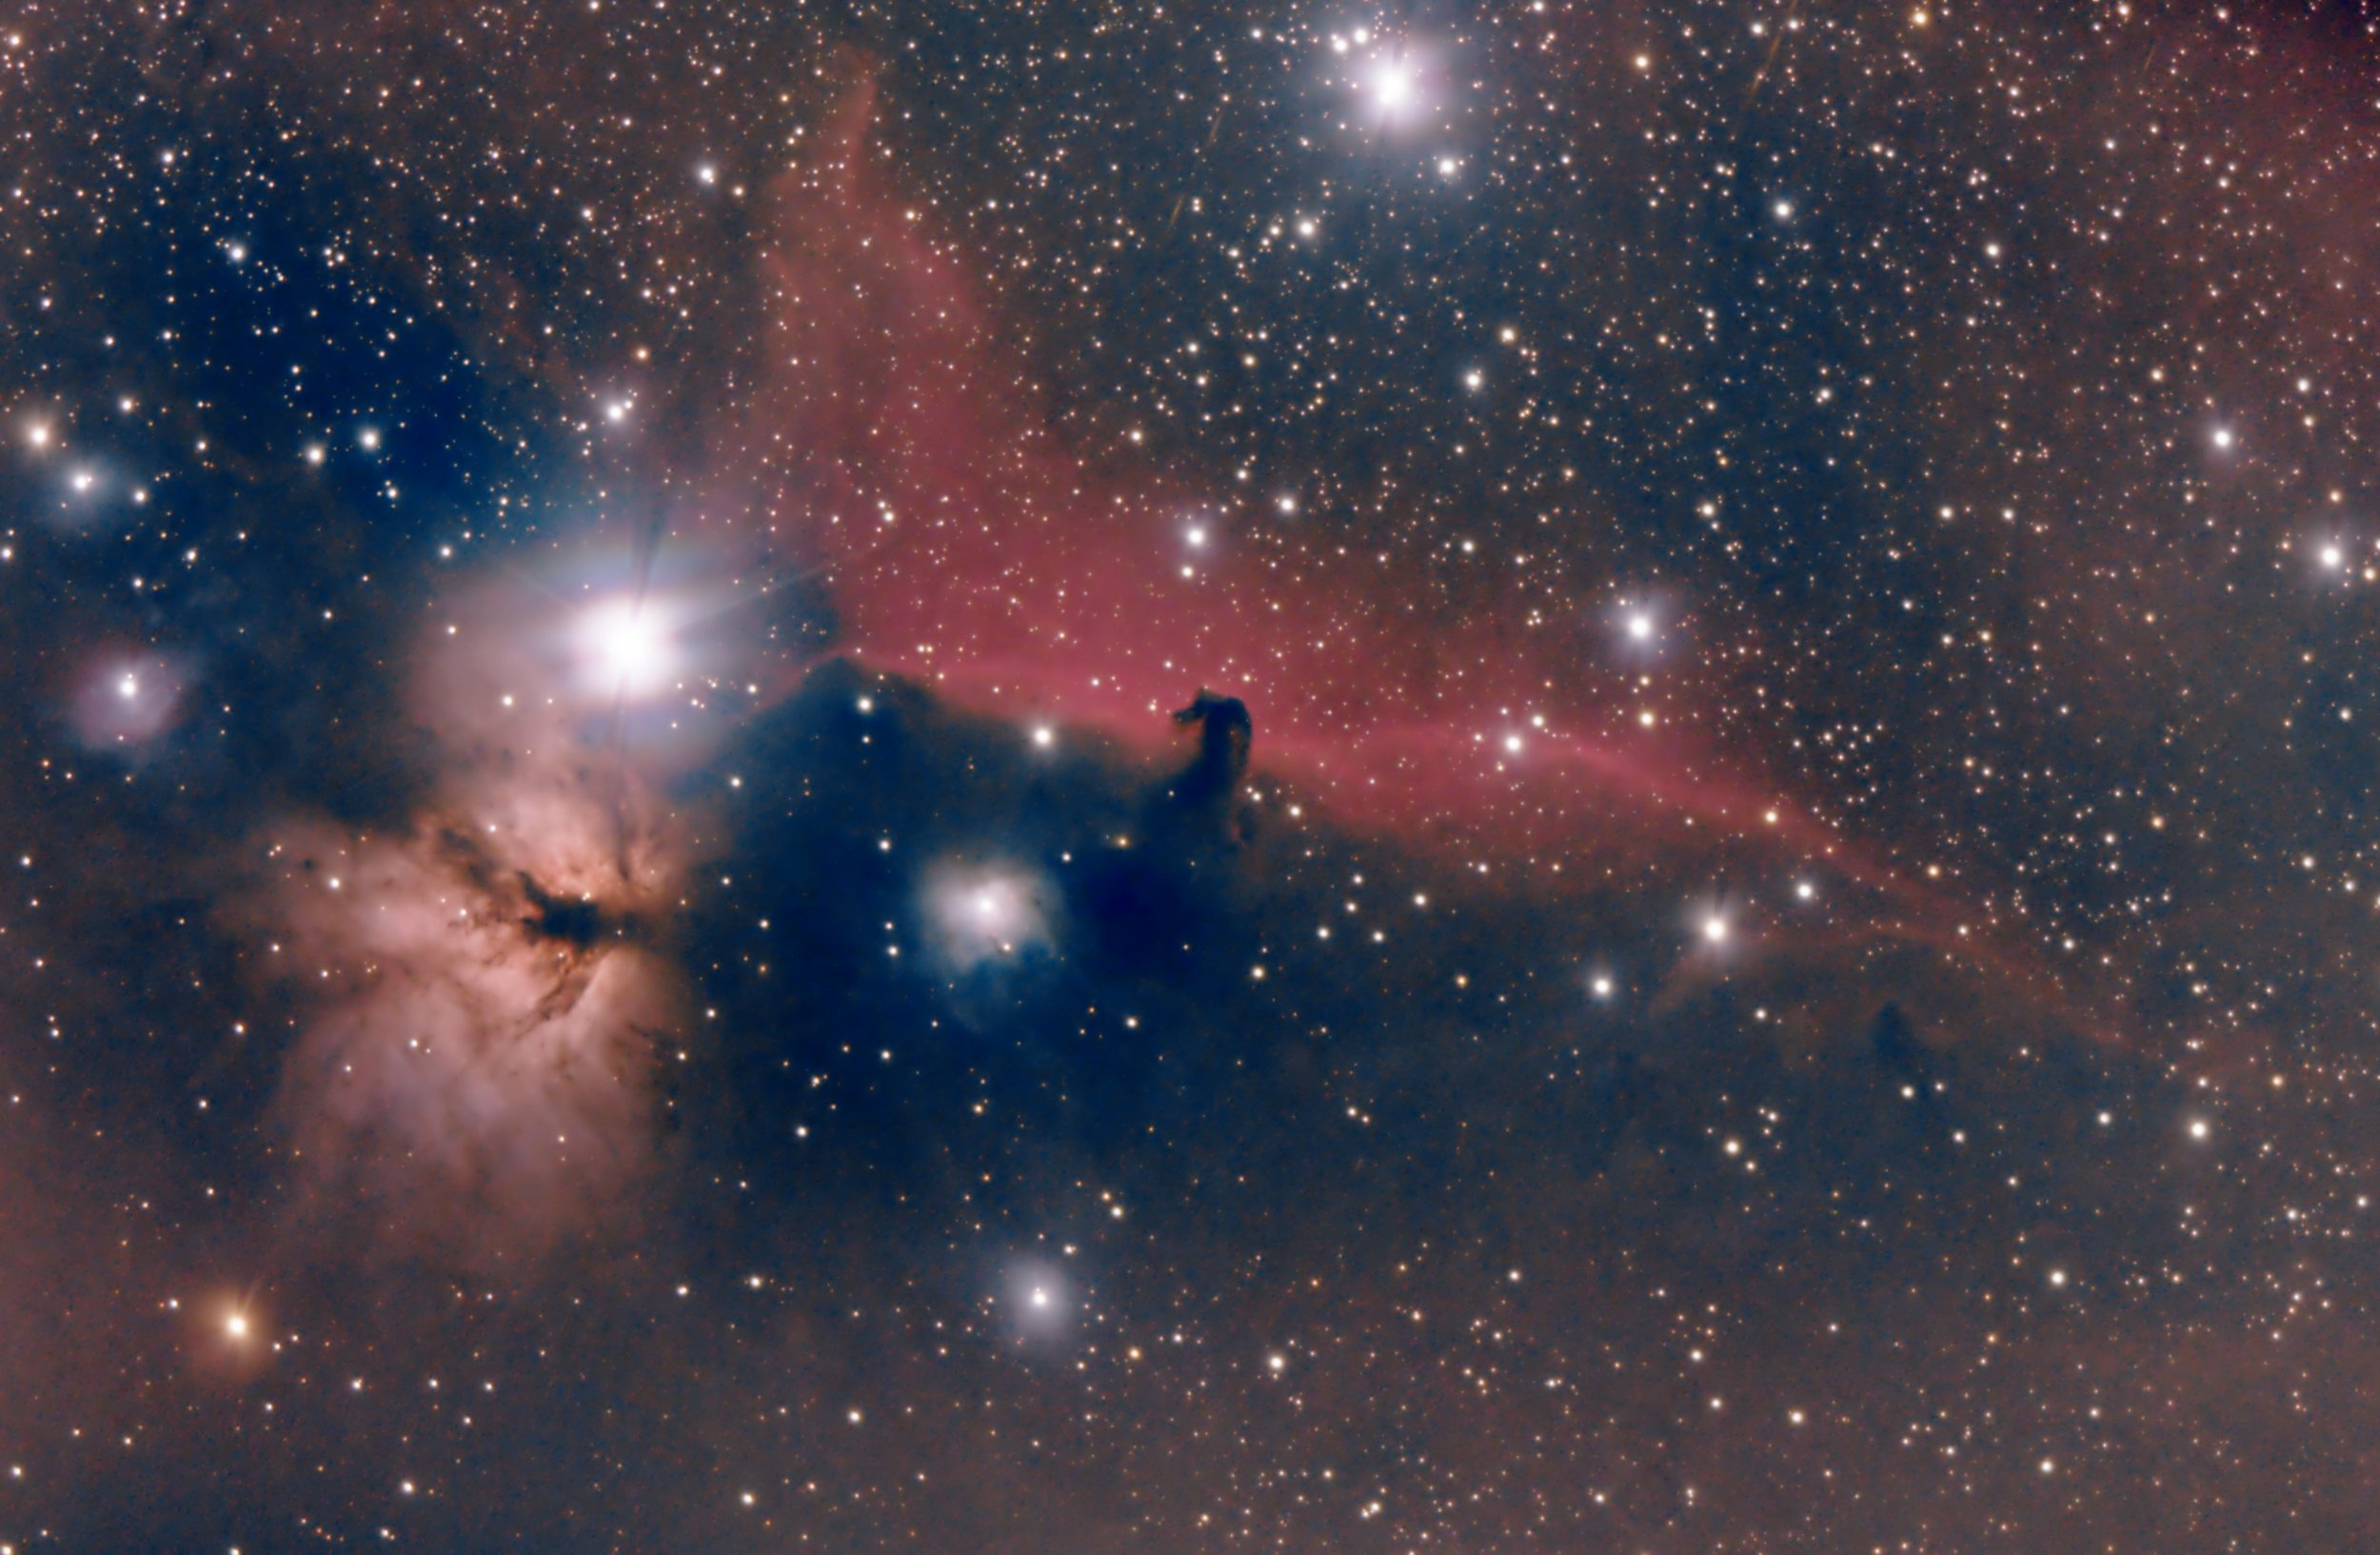
Shooting the Horse Head! 11 feb 2021
The DSO targets in the Orion Constellation is moving towards the end of their prime season. The poor autumn/winter didn’t give us much change this time. Just grasping for some short subs to get a peek of the famous targets to set a low bar for next season.
The Great Orion Nebula was imaged last time. Up next is the Horse head nebula.
The iconic horse head siluete on a red carpet of Hydrogen with the Flame nebula and Alnitak is something that just must be captured. Don’t know what’s taken so long.
Anyway, we can rant about weather and make up excuses, or we can go out and shoot the damn thing. Grab what you can, so to speak!
The grabbing will be done with my IR-modded Nikon D7000 through Skywatcher Equinox 80-ED APO.
The Rig is the CGX mount from Celestron and guiding will be done with ASI-120 MC on an OAG with a 0.7 reducer.
Camera is set for 800ISO with exposures of 180s.
Regarding the OAG, I first didn’t really mind the “diffraction spices” it caused, since it worked so nicely. But I must say that it’s loosing it’s charm. I must see what can be done about it. Focus spacing, etc. We’ll get back to that later.
The image looks a bit noisy, and thats true, but it's also nebulosity that I kinda like. I prefer to have some more of that stuff if it's there since I like nebulosity.
It's my picture, and there are just enough of high contrast images out there.
As always - May the dark side be with you!
Orion time! 5 feb 2021
Almost missed the whole season, AGAIN! I’m dammed if I don’t get any images on this target this year. There is so much to image and so little time to do it!
So, for two consecutive days I managed to get at least some images of the tip of Orion’s pe… sword!
I plan to capture images with 120s exposures @ 800 iso for the main nebulosity and 15s @ 800iso for the core. The core consists of 4 stars called “the trapezium cluster” and will not be made out in any lengthy exposure to reveal nebulosity.
I will also do a little walk through of how I make an image merge of the two exposures in GIMP.
I have been using my old Skywatcher Equinox 80-ED with 500mm focal length. As imagining camera I’m using my Nikon D7000 with IR-mod, and a ZWO 120 with reduced OAG for guiding.
To combat dew and frost on the lens I found an old drain pipe that has a too perfect fit to be left unused. Using 1.5x opening diameter I’m now stretching 160mm beyond the front lens. The old drain pipe is painted black inside and foam insulated outside. It meshes up with the kanthal wire I have around the built-in dew shield. Even the coldest nights are no match for the new dew fighting system!
May the dark side be with you!

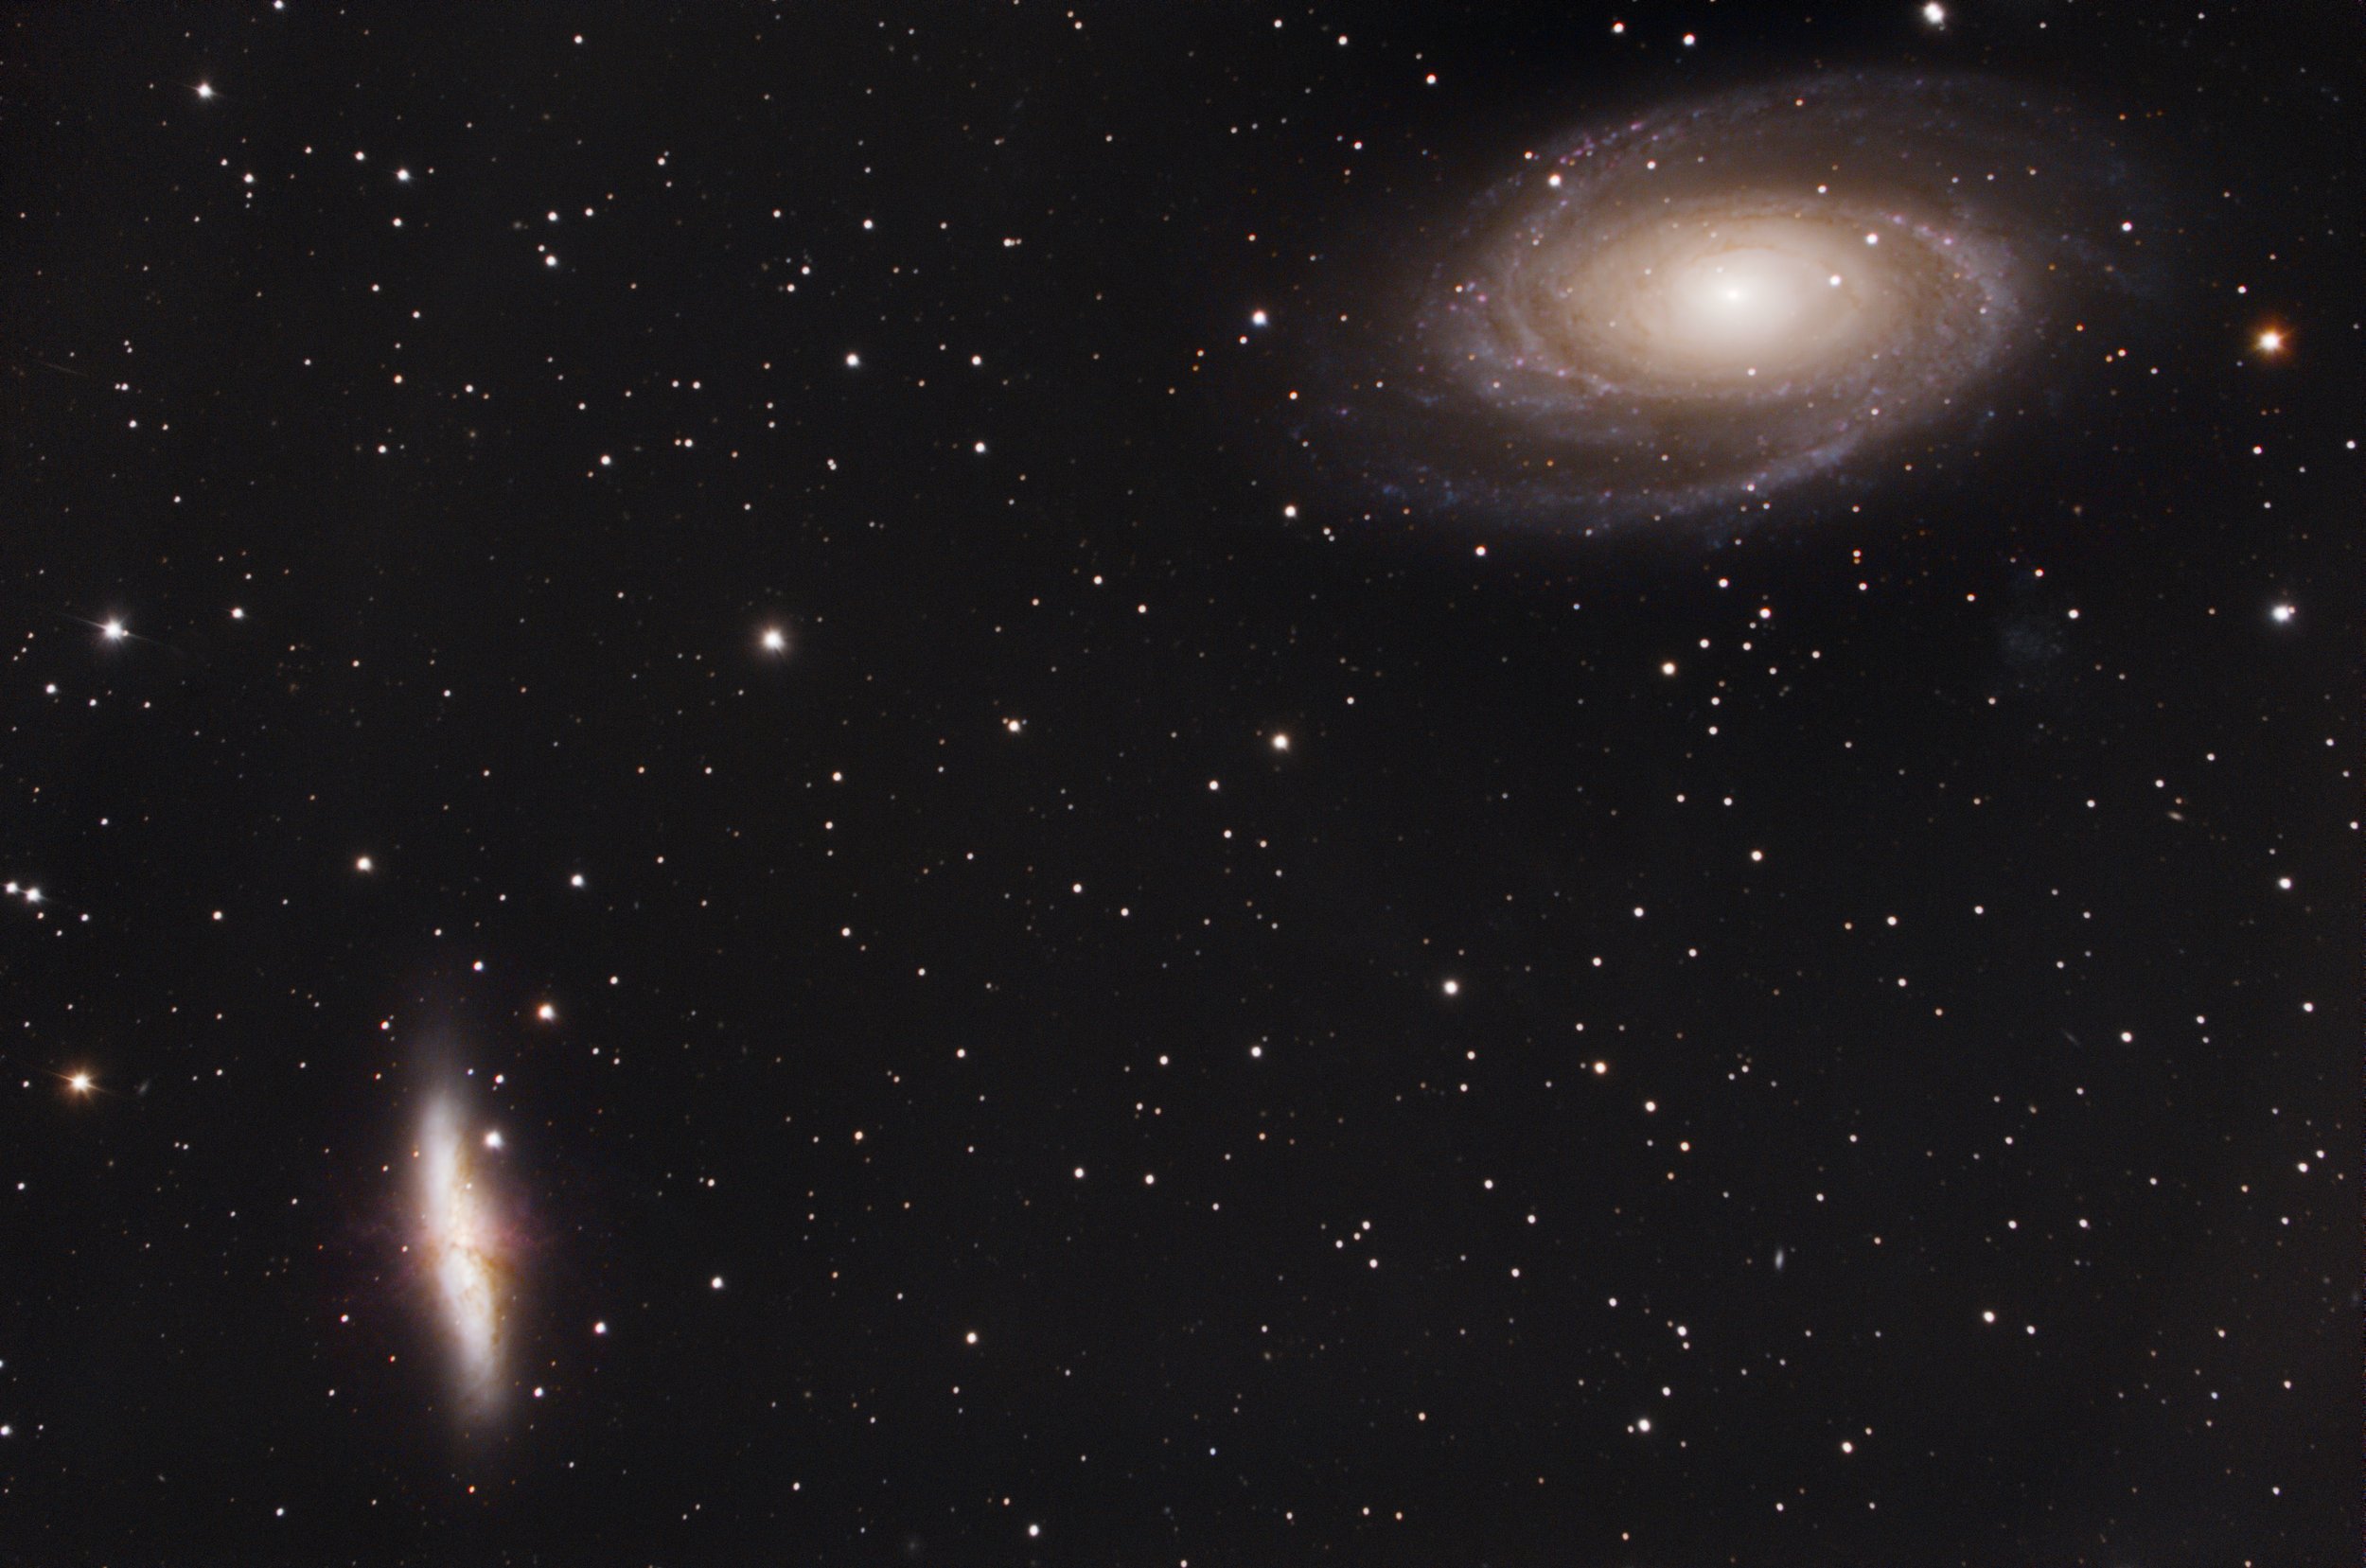
Bodes & the Cigar from 19 April 20
Happy New Year! Let’s give 21 a big, warm welcome.
Since last time I have been trying to make some sensible content out of the project I have been diving into since the summer to keep me sane during the horrible autumn and winter (really, winter…?)
Since I’m no Youtuber, yet, it’s taking it time go make some good content out of it.
I thought I’d just get through the material I had from galaxy season out there. If nothing else to remember those happier days of good, clear skies.
Target for the evening was Bodes galaxy, M81, and “the Cigar galaxy” M82 in Ursa Major.
The Cigar galaxy might seem small and dull, but it’s what called a “Star burst galaxy”.
If you look closely you can see streaks of red from its core, stretching out in space. Not to go too deep into the subject, this is fresh hydrogen that’s being ejected from the galaxies along the centre axis and is then pulled back to the outer regions where it can form new stars.
I’m sure to revisit these if weather permits to get more data on them. Great objects!
The CGX mount did not make me disappointed. Hope this will be a long lasting saga of good performance of this mount!
May the dark side be with you!
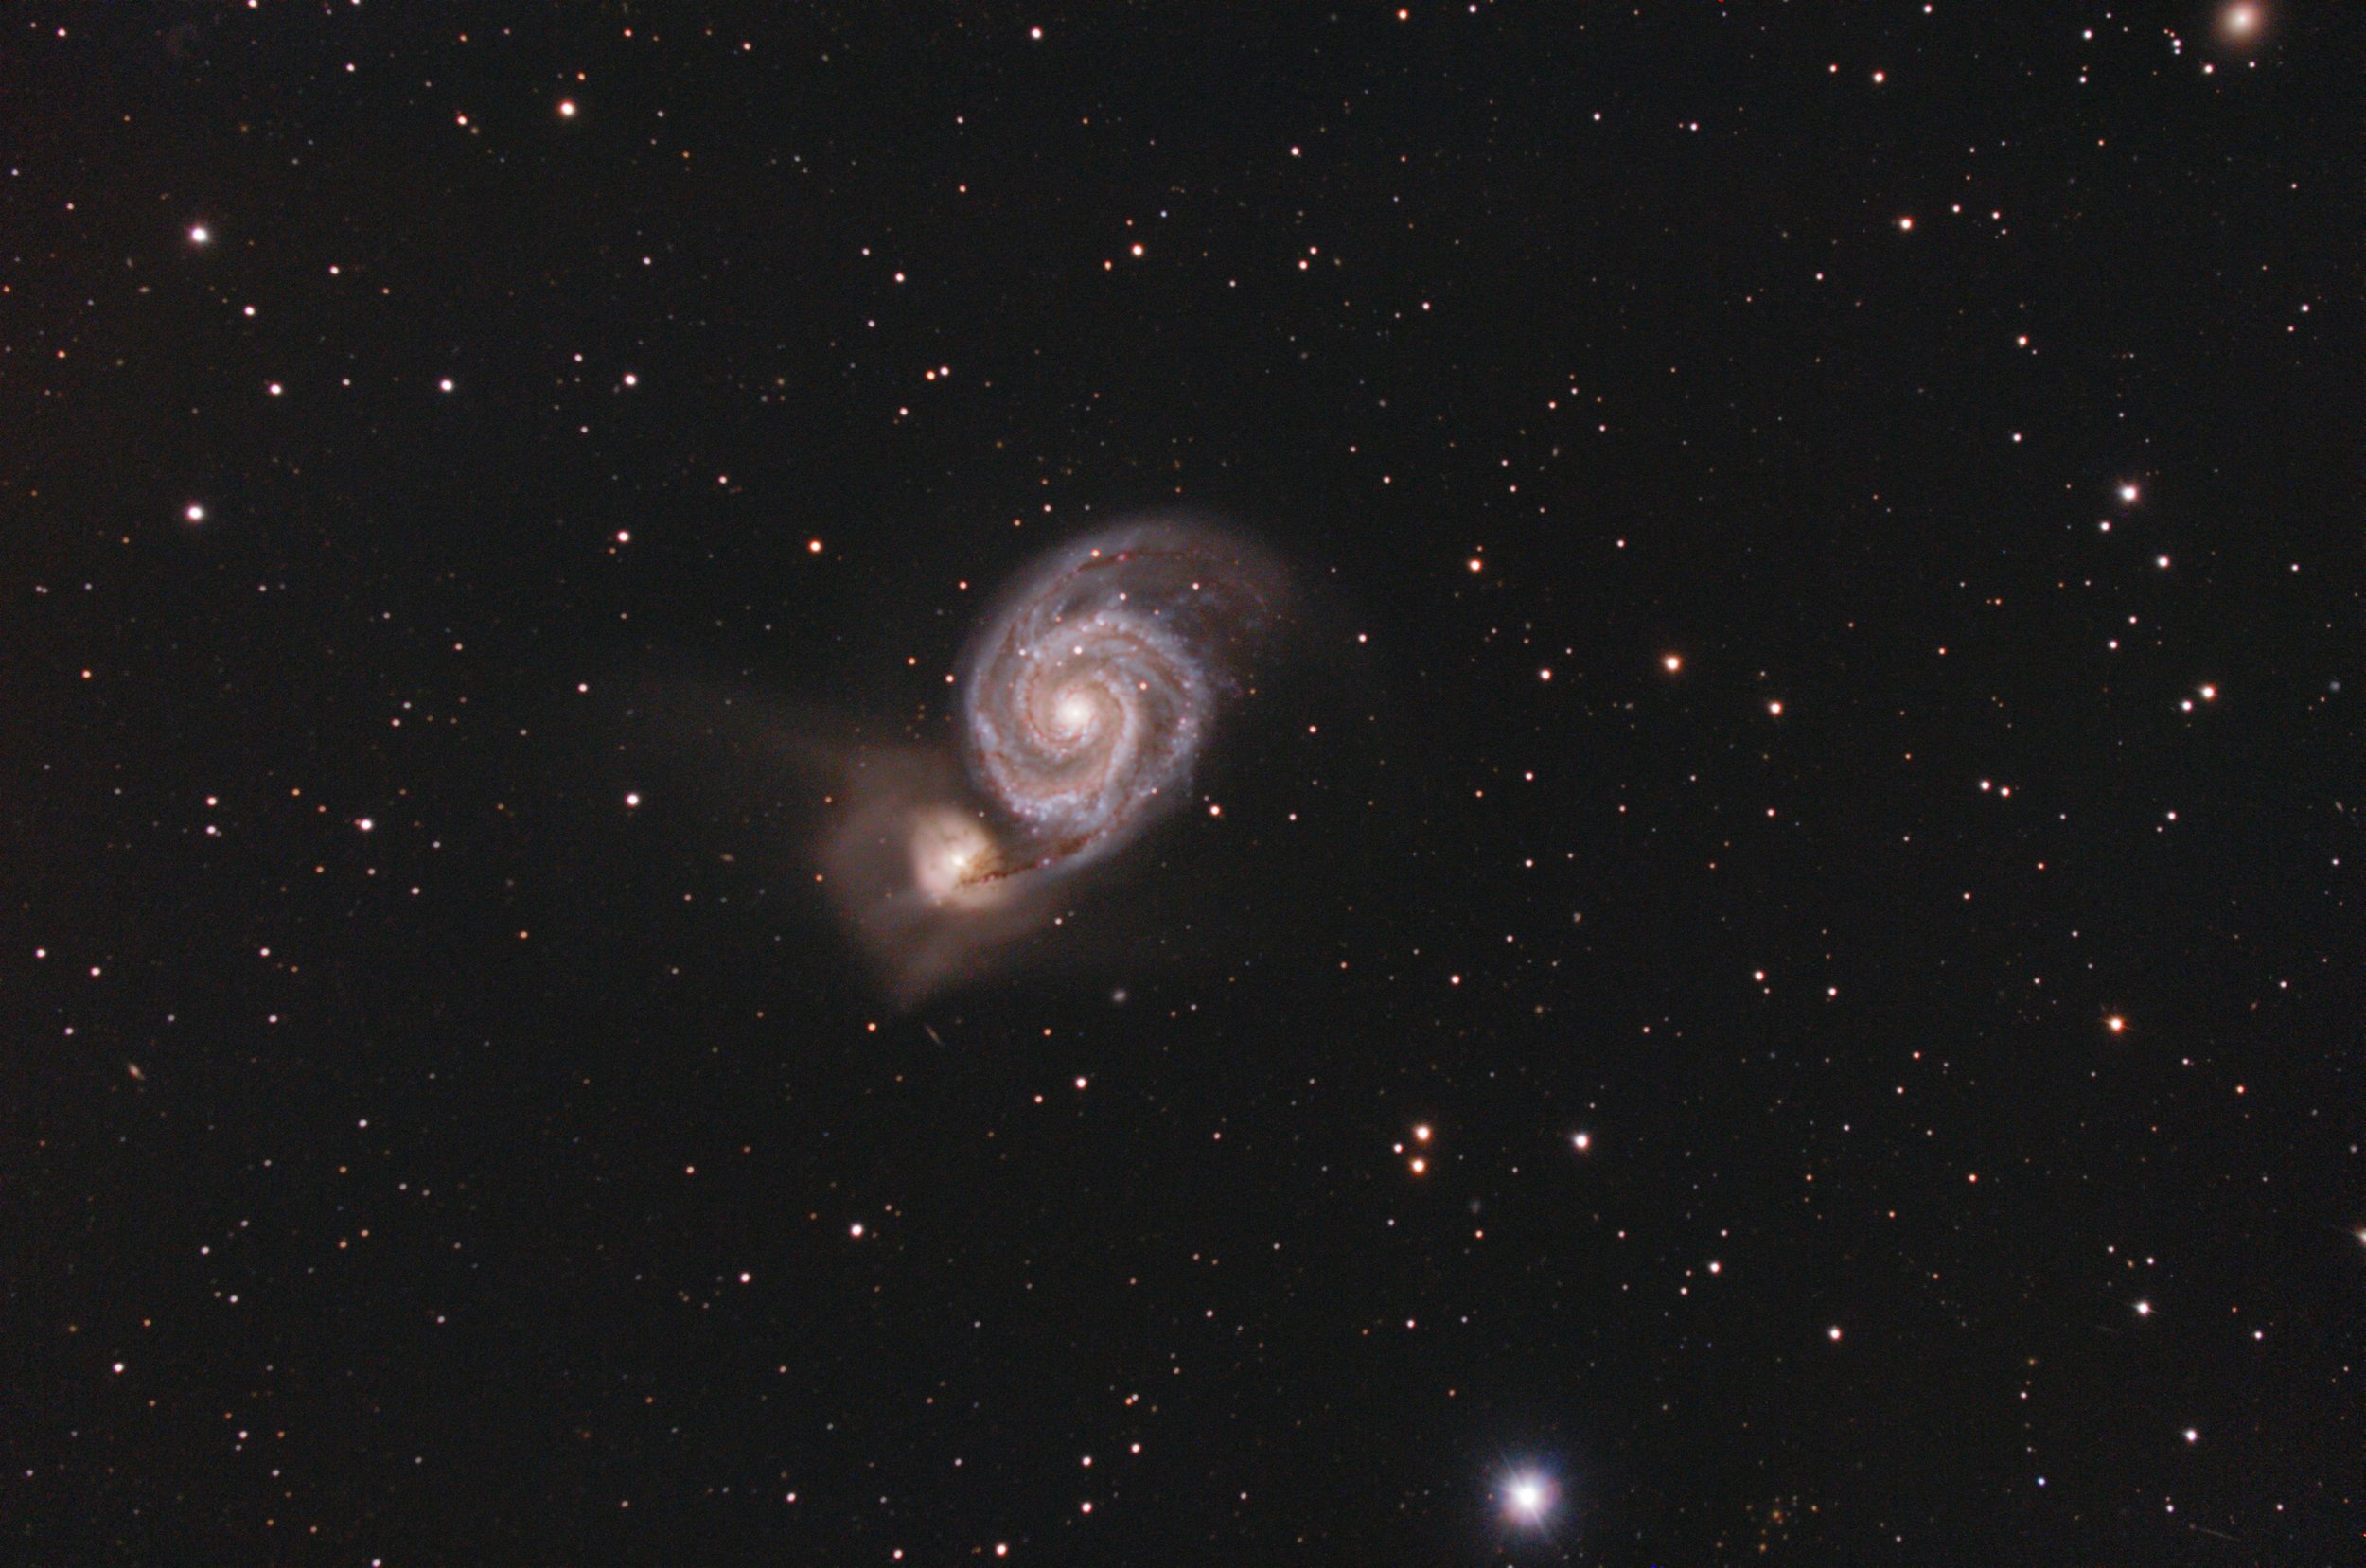
Capturing the Whirlpool galaxy from 17 April 20
One of my favourite galaxies is the whirlpool galaxy M51 in Ursa Major. It’s actually two, interacting galaxies, caught up in a dance about 23 million light years away. The nebulosity from the arms as they start mixing up is great (visually, who knows what it’s like).
It’s actually a sight that we’ll be close up to in about 4.5-5 billion years, when the Andromeda galaxy and our milky way is hitting it off.
One target for the evening was to try my new camera for recording this stuff. I was on hunt for a camera with night vision to be able to record something out in the field. I found this D-link, motorised Wi-Fi camera on sale.
With Wi-Fi available it felt like a nice option. We’ll see how it works out. I’ve been using D-link before and they do work simple enough. Not sure I like the framework that your caught up in though. Everything is tied up to the app and I haven’t found a way to use it stand alone. I’ve got it on a tripod powered by a battery bank and I can leave it overnight with a motion trigger to alert me if any wild life is making a mess.
In the video below, I’ll go through my basic imagining session from when I have the target in sight. There is a little tip for DSLR users in there as well. The beauty of the setup I’ve got is that I really don’t need to do any star or polar alignments on a regular basis. It’s been working pretty well for some time.
CGX mount is behaving pretty well as well. With guiding accuracy of ≈ 1” total I don’t thing I would send this back even if I was offered the opportunity. I’m getting it under my thumb and I think in some time we’ll be good friends anyway. It might be a Frankenstein friend, but they can be good friends too! There are still a few hick-up’s that need to be fixed from Celestron's side I think. For instance, with the current firmware on the HC: CEM 5.31.9200 there is no longer the user object option. You can’t save, and of course then not load user specified objects. You can get the RA/DEC coordinates, but you have to record them yourself. Pen & paper, picture or great memory. That sucks and need to be addressed. I also tried to reload the firmware in case it was an error, but I could not connect to it with the CFM software...
From other users I have heard that they have the same menu tree.
Anyway, that’s the rant of the night!
Setup the Off-axis guider with a Twist 28 May 20
Are you interested in the Off-axis guider concept, but afraid to try it out? Will the stars be bright enough, or will you fumble in darkness?
So, after some questions about the setup:
Here is a video on the setup of "the Off-axis guider with a twist"
- a reduced OAG to brighten the image!
You'll get an insider tip to my setup and all details for how it works. The setup of-course works with any system ones the focus points has been set between the main imaging camera and the guide camera. If you stick it in a system with more back focus you may want to change the setup for better reduction however. More on that in the video.
There are some back focus talking somewhere in the middle, around min 7-12. Not the most scientific and in-depth illustration. Just a touch on why it's a big thing.
It's still just an Off-axis guider. Don't expect magic, but I'm sure you will find that the image is brighter and with a somewhat larger field of view.
Try it out and let me know how it works for you!
Strange Period! 11 May 20
Since I got my CGX mount I have battled performance issues of various kinds. From a point where it was pretty useless, it’s now guiding with a total RMS of just around 1”. Why complain at this point?
Because I was sold on the idea that the spring-loaded worm gear meshing would smoothen out the periodic errors! But it’s anything but! Or, I just don’t want to see how it would look like without it.
The part causing me most grief at present time is, as one might guess, the RA axis. There is a periodic error on this that I’m trying to wrap my head around. PEC training on the mount could most likely deal with the main worm PE, but I don’t know if it will help out with this. I have tested PHD2’s Predictive PEC algorithm, but it doesn’t seem to work for this short period either.
Anyway, you’ll see what I’m japing about in the video.
I’m going to work on the worm gear meshing to see if I can solve this. Not very fruitful to spoil the surprise, but it’s all a learning experience, yeah?
I guess it depends on the image scale of the camera used, but in my case 1 pixel is around 0.5”. If the RMS difference is too large between the axis the stars can become elongated for an exposure.
This means that if I’m guiding, for instance, with an RMS of 0.8” in DEC, and 1.5” in RA my stars will start to get elongated. Whilst if I had an equal 1.5” RMS, the stars might just look slightly bloated.
After this I might just need let the hardware rest to exercise a better guide settings.
Summer is upon us anyway though. Maybe one should start moving south for the summer and north for the winter?
Rock on, and may the dark side be with you!
Pinwheel Galaxschyy! 10 April 20
After I changed telescope for galaxy season, the moon and slight upset weather put a stop to quite a few days of pure joy. But, only 2-3 days after full moon, there are already a few hours in darkness.
Today I’ll prepare for a shot at the Pinwheel galaxy, M101. It’s a bright and large galaxy in the constellation Ursa Major. It’s a face on spiral galaxy with a safe social distance of about 20+ light years.
I’m not using any filters (although I removed the IR-cut off filter from my DSLR) so we’ll see how the H2 regions comes through in the end.
Also, there’s no observed super giant black hole in it’s centre. Normally galaxies this type and size has one. So, we don’t expect to see that…
We’ll see how I succeeded in the end, and also how the CGX mount behaved with this larger focal length scope.
One must be careful however. It’s easy to get drunk on success, when the equipment works you favour. Post-processing the same night can be very hard to resist. Be warned.
Stay well, stay apart (for now), and may the dark side be with you!
Galaxy season! 27 Mars 20
Winter is about to give up. It hasn’t really showed up this year, but the sun has stayed away, and that’s all we care about!
Springtime means Galaxy season! It’s a short period for us here in the north, so let’s make the most of it.
To do this I have to remove the small refractor and replace it with my SCT (Schmidt Cassegrain Telescope) to shrink that field of view down a bit.
I’ll still use the 0.7 reducer since I have set up the OAG for it and can’t be asked to change it. It would however be much better with it since I could get the full 0.5 reduction on the OAG reducer.
Targets coming up is Pinwheel – M101, Whirlpool – M51, Sunflower – M63 and more.
Stay tuned to see more of them the next coming weeks!
Rock on, and may the dark side be with you!
Boring CGX review!
One can only hope it’s useful! I have been meaning to make a review on the CGX mount I bought some 4 month ago. I have been using it for about 1 month because of some issues that I experienced.
Before I got this mount I had Celestrons CGEM, and their EdgeHD 8” SCT.
Feelt a bit like a Celestron fan boy, but I really wanted the CGX mount. The CGEM was 2nd hand when I bought it and “hypertuned” by the previous owner. It worked fine at a start. But as I wanted a more consistent and fine guiding I started to search for a new mount.
The journey has not been an easy one. See the review for the story!
The Villains of the Sky 26 Mars 20
So, the season is nearly over and the faint nebula targets are getting harder and harder to catch. It’s in the 11th hour that I change over to the SCT and capture some narrow field of view stuff before the season is truly over for deep space objects.
One last target. The infamous “Villains of the Sky”!
Or, so it should be called.
NGC 7000(North American Nebula) is almost too big for my 500mm refractor, but I like the capture anyway. Might build on it next season.
16x300s ISO1600 Lights, 21xFlat Frames, ≈15xDark Frames
Equpment:
Telescope: Skywatcher Equinox 80 ED
Mount: Celestron CGX
Main camera: Nikon D7000 – irmod
Guide camera: ZWO ASI120mc-s
Guide scope: OAG + 0.5 reducer.
Flaming Star & The Jellyfish 25 Mars 20
Astroboden is marching on doing more large nebulas.
Jellyfish and the Flaming Star nebula.
We also look on framing the targets in Stellarium. Great piece of software!
The evenings main target was the Flaming Star nebula. It got some last-minute company from last night’s Jellyfish. And we could say the jellyfish burned the Flaming star… Or at least some of its imagining time. The whole thing piled up and we got mostly rubbish.
The atmosphere was just not cooperating and the noisy Jellyfish is not pretty.
The flaming star was in the same region, and got some of the same deal.
Some meaning to it all though! We know what we’re doing this autumn!
Both the Jellyfish and the Flaming Star are great targets that I just can’t wait to revisit (yes I can. Really, this time I mean it).
Equpment used:
Celestron CGX mount
Skywatchers Equinox 80ED
ASI120MC-S
OAG – with reducer
Nikno D7000 - irMod
AstronPi - Raspberry Pi guide computer
Head of Cthulhu 22 Mars 20
Time for some more “wide field” stuff! Everyone seems to be doing the Jellyfish nebula? Thought I go and check out what’s that all about. It’s a target that is only reasonably high for the first part of the evening. Then we’ll find another target.
Going ahead in time, that focus screw to hold the focuser is sleeping with the jellyfishes tomorrow. It’s been bothering the wrong guy one time too much.
A regular, and far too long hex-head, machine screw will do the job just fine.
Spoiling the plot, the Jellyfish did not make it to the market. All that was left was an unfocused blob.
Anyway, there is a new main attraction!
- The Head of Cthulhu!
Yes! We are renaming that old trunk! “Elephants trunk” my a**e!
It’s my picture, and it is what I say it is!
There is also another, special guest in there!
The CGX mount is still holding. Really hopefull about this now. I'll keep my guard up till it showed off with the SCT though.
See how the setup looked and the rest of the story on:
The CGX success continues! 20 Mars 20
The CGX mount pulls through and we get to process some data!
Last time I did the Soul nebula using my Skywatcher Equinox 80ED on the CGX mount with an off-axis guider(OAG).
Every day has it’s own little share of challenges, naturally. I started out with the Andromeda galaxy. It was too low in the sky and setting in a bad spot, so we’ll get back to this in the autumn I think.
Then I thought I’ll go and do the Flaming Star Nebula for a few hours.
I’m basically shooting targets left-right-centre. I’m absolutely trying to compensate for lost time!
Anyway, when that was too low in I was switching target to the main object: The Heart Nebula!
When checking focus between I noted that it had shifted… For how long have it been bad? Too long it seems… The flaming star nebula was a bag of S**t.
It seems like the set screw for the Crayford focuser was not holding up the task. As a quick-fix I taped up the focuser. It lasted the whole night!
For both the Heart nebula and the Soul nebula the stars are quite overpowering.
Got to practice my processing skills with #Pixinsight. Very power full software, that I only started to get my hands into.
What I can say though is that whoever made it probably left the matrix ages ago. That stuff really need tons of practice and blind acceptance, unless you really know your stuff. Still there are plenty of tutorials around and instructions to guide you.
I got my star reduction tutorial from:
https://www.lightvortexastronomy.com/tutorial-reducing-star-sizes.html
Check them out if stars are a problem for you.
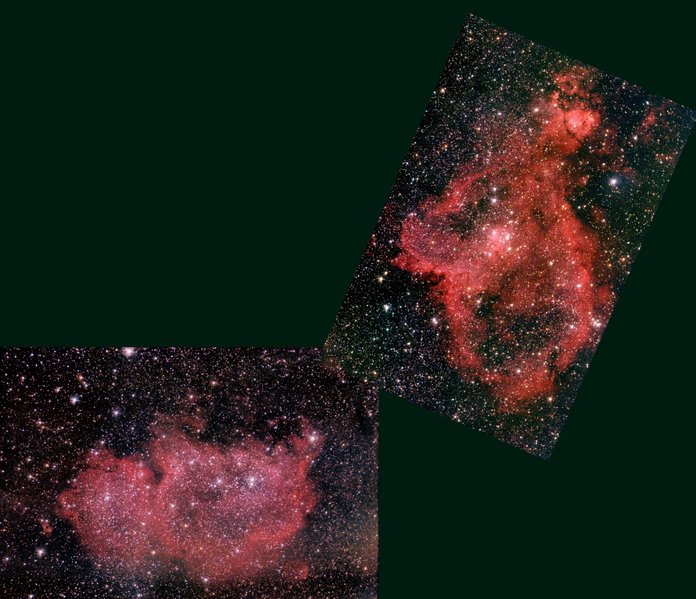
I also made a little mosaic from the Heart and Soul! Illustrates how they are positioned in the sky. I did the mosaic in GIMP. Maybe not the best choice, but it did the job.
As ususal, you can follow the process on YouTube:
CGX redemption 19 Mars 20
What’s going on at Astroboden?? Sounds like a party, and it’s been going on all night!
Lucky there are no neighbours around.
Is it a funeral party for the CGX mount, OR is it about to redeem itself?
Expect no evidence of the crazy night that was inside, but the party animal Balti almost knocked the camera over in excitement.
The CGX mount has been out a whole night with “wonderful” guiding!
It’s not out the woods yet, but with this result I have some serious catching up to do!!
I’ll get on with a review on the CGX here soon. It might be redeeming itself, but there are some things here still I can’t get my head around…
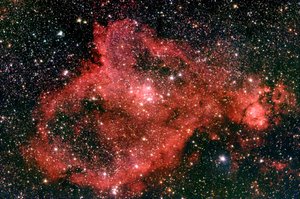
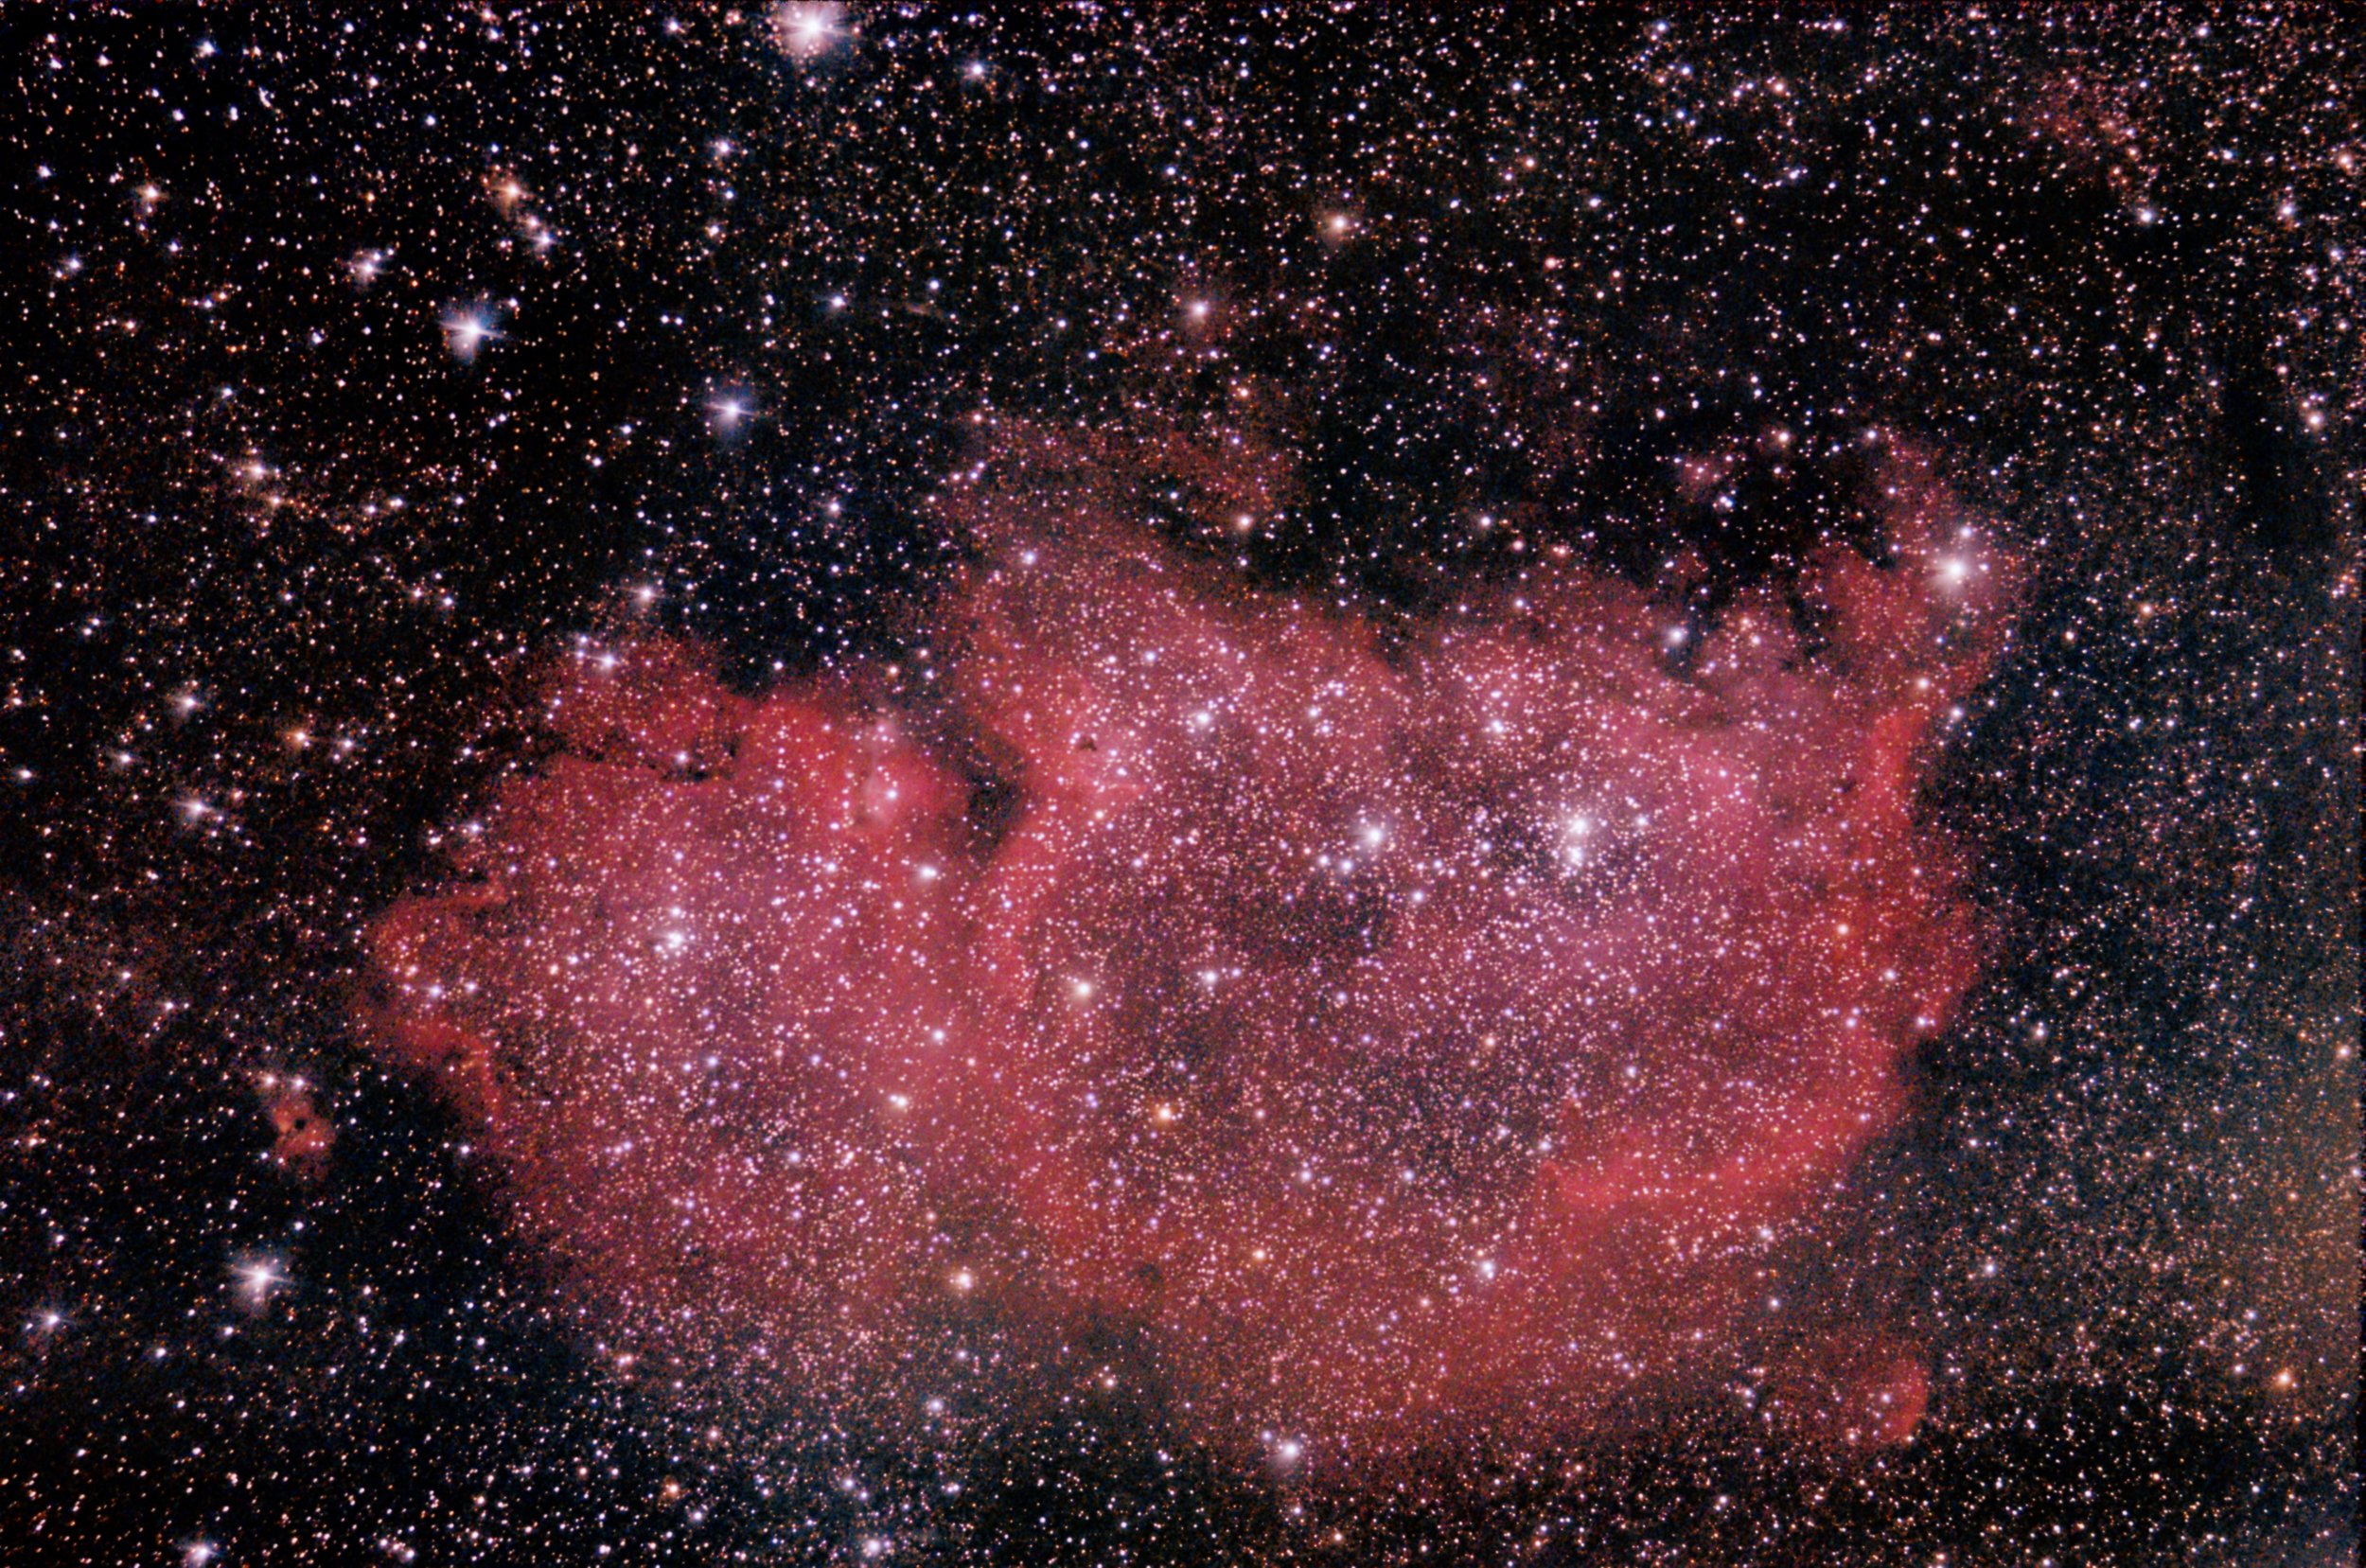
The rest of the evening was dedicated to the “Soul nebula”, or "Westerhout 5", IC-1848 in Cassiopeia.
Very nice target. The name “soul” feels a bit philosophical, but with the “Heart nebula” just next door it makes some sense. We're not going to refer to it as “the fetus nebula”, are we?
Or “Cat fetus nebula” even.
Unless it’s a human with horns! Now we can get philosophical!
Anyway. Cool star forming region.
I’m practicing my star reduction techniques. Some way to go yet, but pixinsight has a lot of punch behind it, so we’ll get there eventually.
You can see some more on:
OAG with a Twist! 19 Mars 20
Got a bit tired of the guiding issues I had now and felt like making a change.
I’ve had an off-axis guider that I never really go around to use. I was put in use just before I got the CGX and with all the issues that dawned on me then, I removed it as an unknown source. Now I found a whole lot of worms in a can I should have opened and thrown out ages ago…
One fear of using off-axis guider is the long focal length, high F values, and the difficulty to find guide stars that follows. I’m testing a method of using a reducer in front of the guide camera to reduce the focal length, and get a larger, brighter image.
Howling at the moon! 7 Mars 20
At Astroboden… under a 90% moon and a cloud cover.
Has he lost his little mind? Is he moon-struck? Have the mount issues finally made him completely bonkers?
Fair questions indeed!
- With nature against you, one just have to work with what you got!
The evening kicked off with stupid motivation and absolutely no astrophotography in mind. But, it just might have produced the most useful result in quite some time!
Check out what’s actually going on:
Back outside! 2 Feb 20
I'm back at Astroboden again. Things is so much quicker when the setup is fixed and ready. Just to attach the camera and focus before the standard alignment. Plus, the polar alignment is pretty much done.
The task for the evening was testing the CGX mount, again. I had done some tweaking daytime that I had some hopes for.
I also wanted to test a dew heater I made up for my SCT that I hope will help out in the future.
After the whole alignment process was finished I could start calibrate PHD2 on a star. I usually go for a star close to the south meridian, low on the sky if I can.
This time the calibration went on with no issues at all. Stressed on to the Guiding Assistant with hope and anticipation. After a few minutes of measuring the verdict came…
It looked good! The first time for the CGX mount! And the backlash was measured to be so small that no actions was deemed necessary. Completely stoked I slew to my target, got the framing done and started guiding.
Happiness is short lived. The spikes came back after a few minutes. Smaller, but still very real with around 6´. Think I still have a binding issue that I have to work on. I did some tweaking of the gear meshing, but it did not solve the issue completely. Also, tried to see if PHD could help out by limiting the corrections made. As a quick fix. Don’t we love them!
So, evening was a big step forwards, but I still have some work to do.
Got some data still, but I’m not happy with the stars still. Think it will be much sharper and nicer stars when it’s all working the way it should.
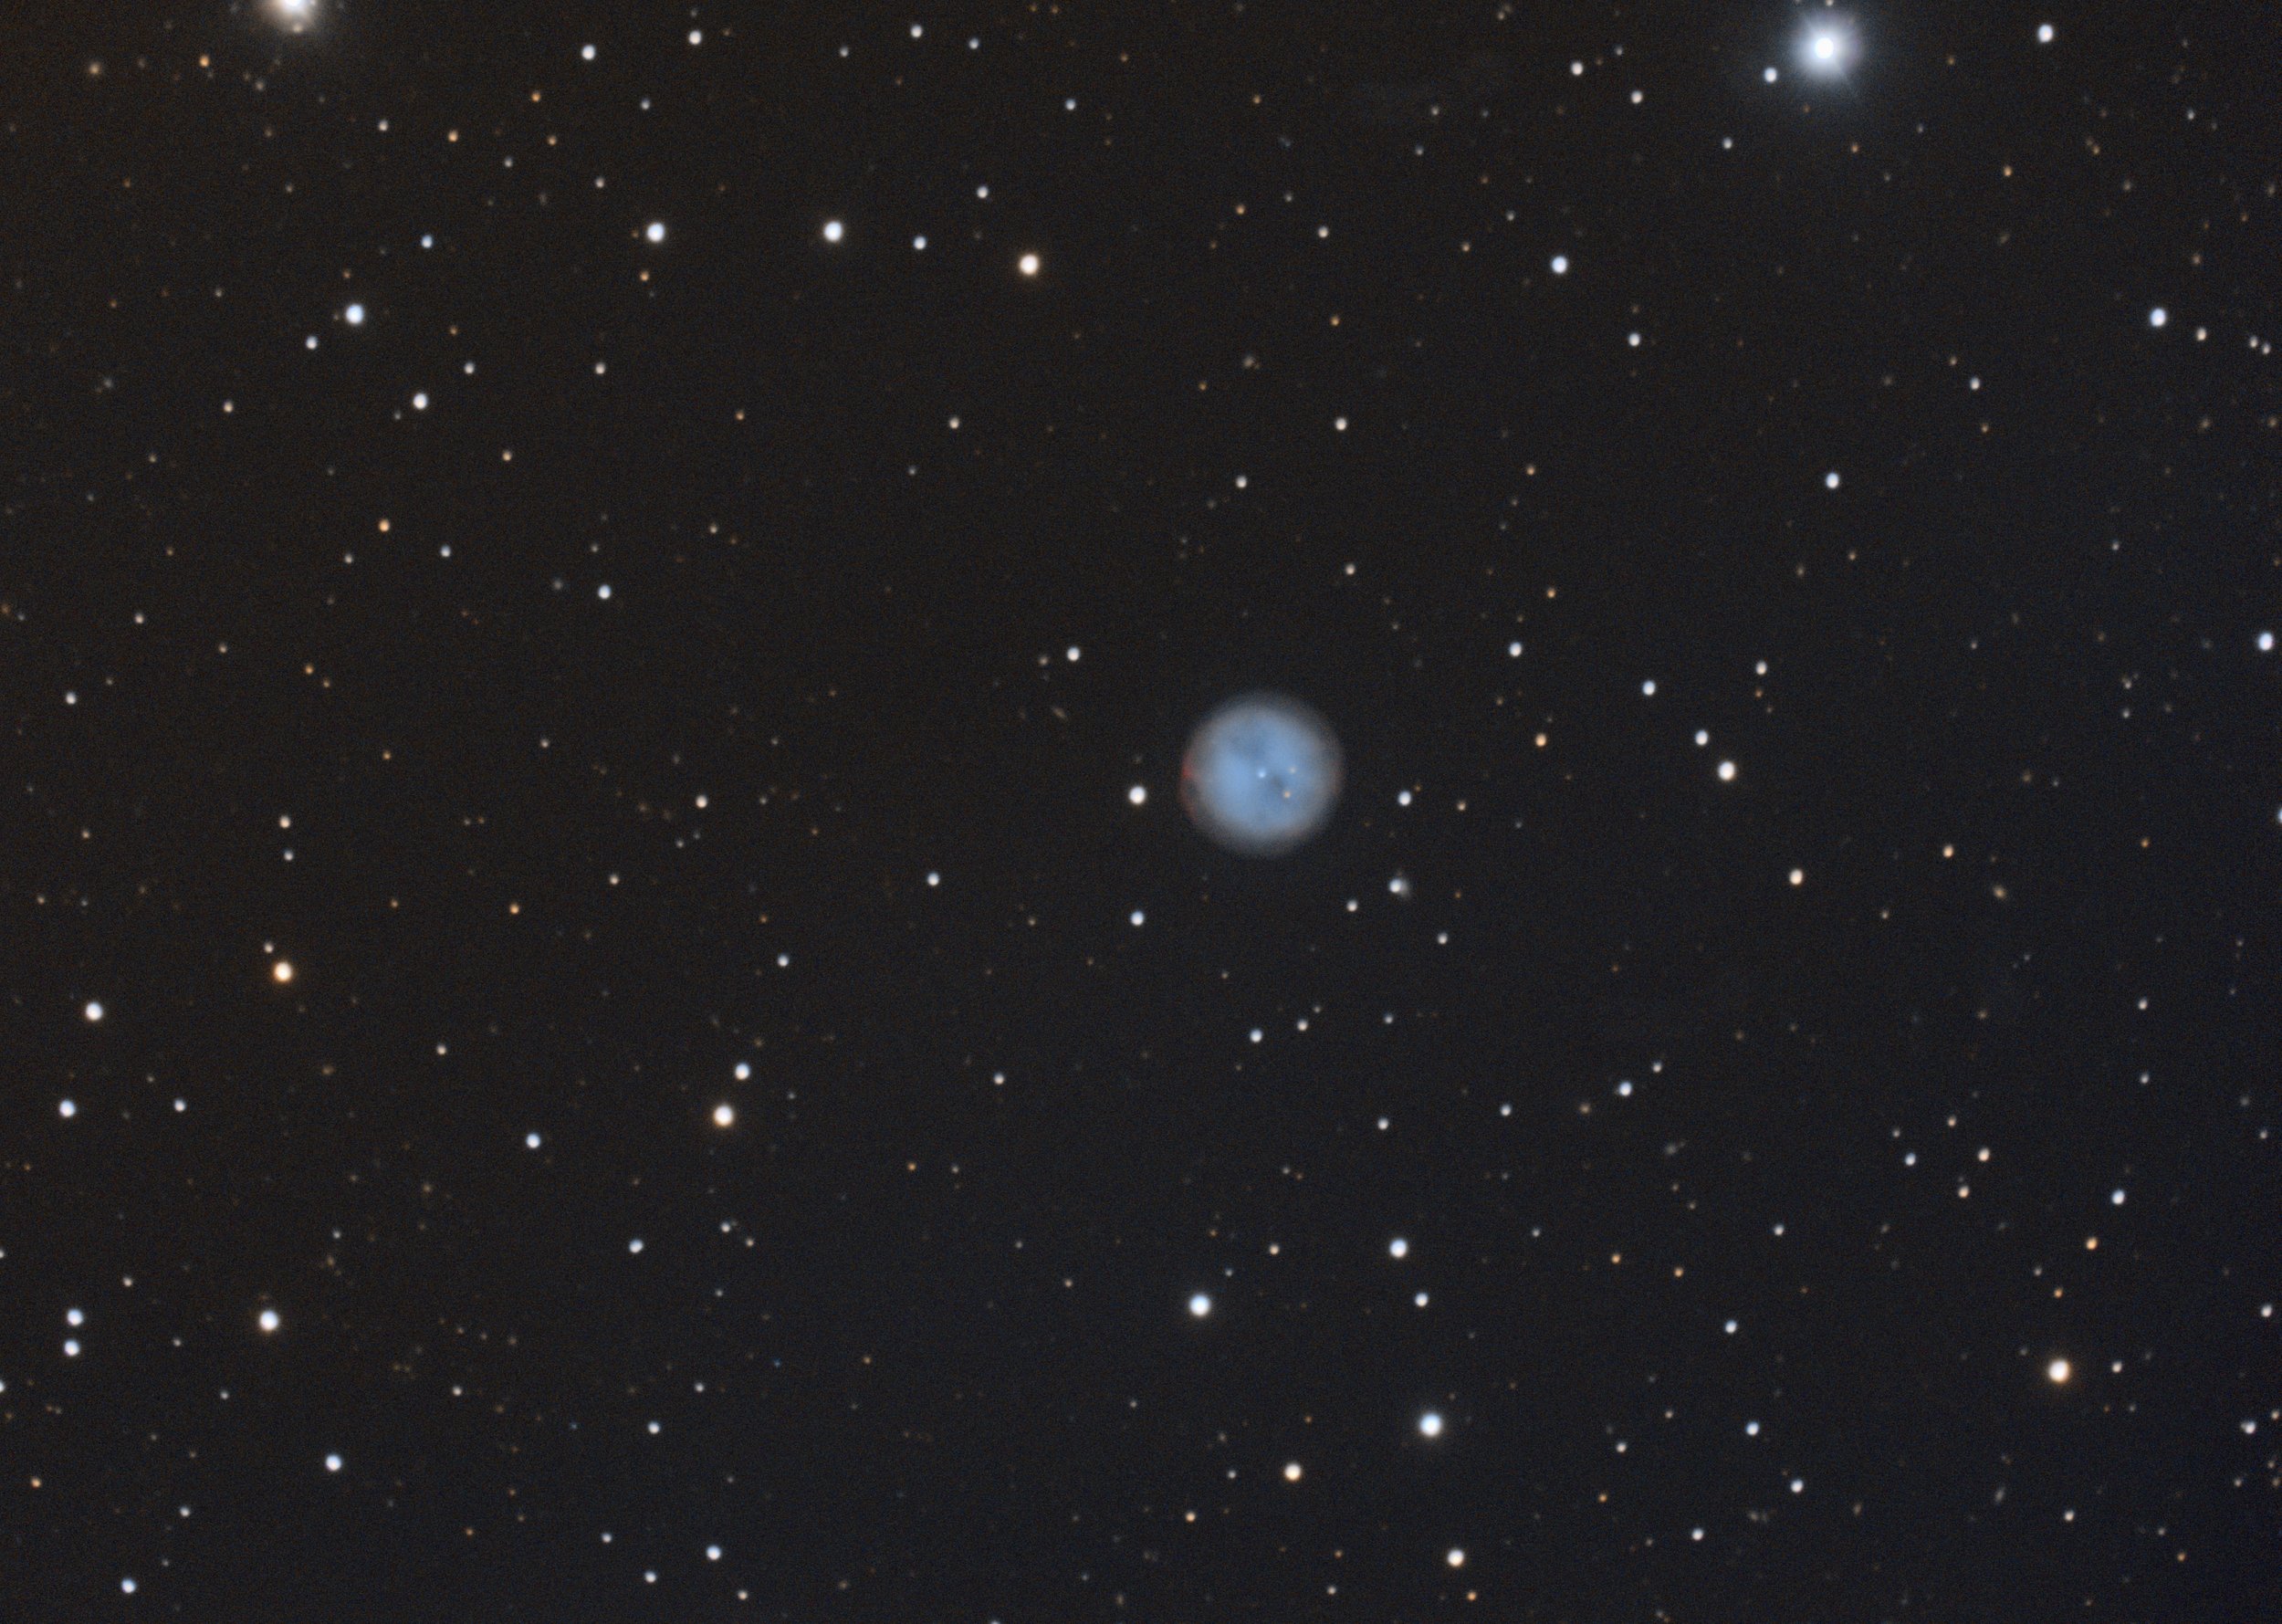
Target was M97 - the Owl Nebula in Ursa Major.
Only got around 25 subs of 300s that was somewhat decent. Potential for improvement!
The dew heater I made up with a piece of kanthal wire performed however! Made a movie of the invention. To be shared some time later.
Anyway, here’s the picture of what the Owl dragged in.
First Light! 18 jan 20
I get to image with my modified DSLR for the first time (first light).
The initial idea was to go for the crescent nebula that I did last time, but since it's so low in the sky I instead went for a target I never captured before:
- The Bubble nebula!
It's a rather faint, but beautiful target in the Cassiopeia constellation.
You may watch some of the imagining session here:
Like always I do rant about issues with my mount and how to deal with them.
I’m still working on how to use music in legal way, but for now I’m just using sounds from various NASA missions. I think they are awesome, but I’ll work on the audio subject to get some more suitable soundtrack in the future.
I did the video with regards to my preparation for shooting the Crescent nebula last time. I basically go through the issues one may have with the type of mount used.
First the video was going to include a part of the session itself, but wind and bad video recording skills did not agree.
I forgot about the whole thing. Till now.
IR blocking filter removal! 11 Jan 20
I have been using my Nikon D7000 for a few years. The result has many times been ok, so I haven’t really felt inclined to modify it by removing the Infrared blockgin filter.
Recently however I have been more and more keen on it, specially since my main focus is deep sky objects and it really makes a difference with that extra data.
So, one cloudy evening after work I decided to give it a crack. I found instructions on lifepixel.com. They have instructions for both Nikon and Canon.
https://www.lifepixel.com/tutorials/infrared-diy-tutorials
Find you camera, print the instructions, and pray to the gods of old.
With the instructions printed, table cleaned and some liquid courage, I got on with it.
The instructions where fine. Good pictures, and simple instructions. Tip: just printing from the website cut some of the pictures so some screws where missing. Better to copy the lot to word (or similar) and print from there.
Also, I would have liked to have a note on the lever on the connector for the flat ribbon cables. Some of them are in the back, and some in the front of the connector. I almost broke a connector thinking the lever was in the front.
If your interested in the whole, fascinating and interesting story, check out Astroboden’s YouTube channel:
!Spoiler alert!
There is a happy ending…
Some more exciting results will be delivered when we have some to share.
Crescent Nebula 4 Jan 20
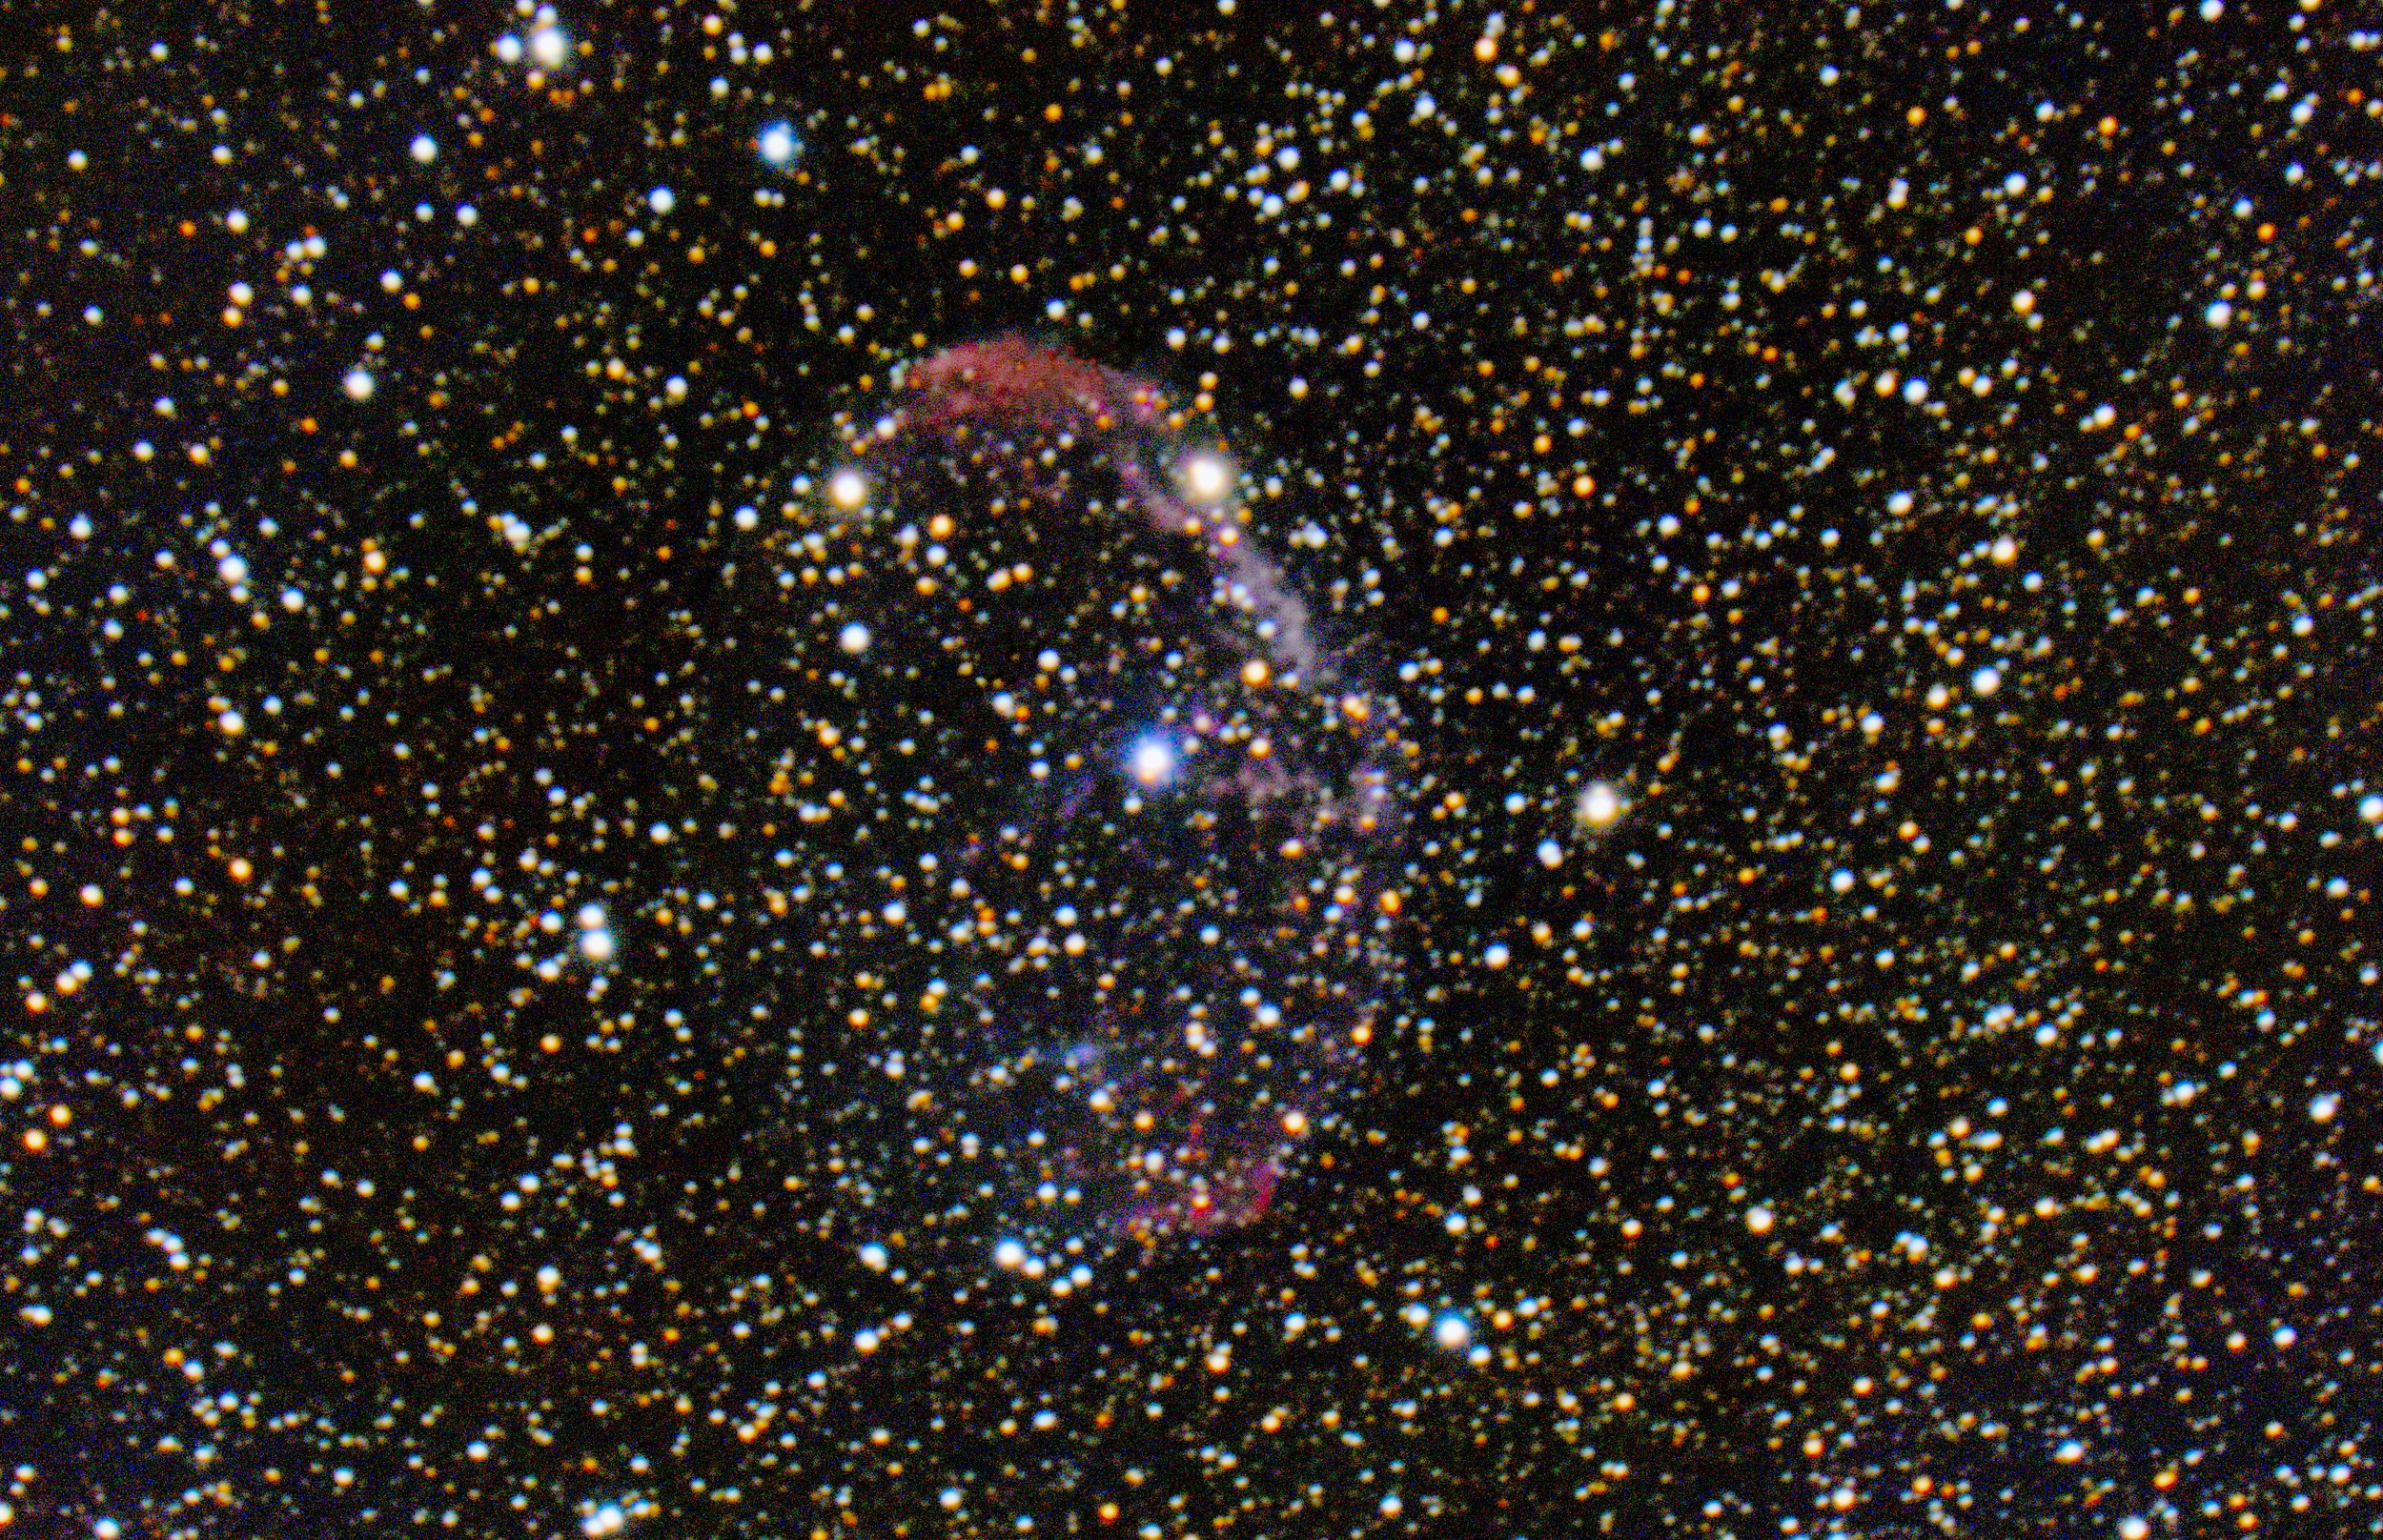
I start the year with a nebula. Can't say that it's a target that excites me a whole lot, but it’s made for a reason.
I have an unmodified DSLR Nikon D7000. It’s been working alright and I believe much of the to-ask-for in the result is down to lack of data and post-processing.
But that IR filter is not helping.
I planned to go for a target with a lot of red and H-alpha. The plan is to shot the target with the unmodified camera. Then modify it and shot the target again with the exact same settings.
The target I planed for is the Crescent nebula, NGC 6888, in Cygnus. There should be a lot of OIII there as well, but I hope the target will show some new things without the filter.
The adventurer of modifying the camera will be documented, (perhaps for everyone else amusement) and the story told later.
I started out with funny issues with the mount and guide computer conflicting. I had the mount on a mains 12V supply and the guide computer on a power bank. I would have thought the common ground would be set with the RS232 line, but the nexstar remote kept hanging up. After hoking the guide computer up to the same power supply it worked fine. -Mental note.
With everything up and running guiding was all over the place. I tried fine tuning the balance etc with little luck.
I dream of my new mount that will come in and save the day…
I did as little, or simple post-processing as I could to make it easy to follow the steps for the next attempt at the target.
Happy stargazing!
#Crescent #nebula
#Clestron #EdgeHD800 0,7reducer, #CGEM,
#Nikon D7000, iso 800, 16×300s,
#Skywatcher Evoguide 50ED and ZWO
#ASI120MM guide camera, #PHD2 on #AstronPi
Edit in #Pixinsight #gimp2.10, #astrophotography
YouTube!!! Dec 19
Astroboden now has a YouTube channel!
It's called.... Astroboden!
Will try to update this as new stuff comes along.
So far it's mostly about my new mount and a small introduction to Astroboden, but more are sure to come.
Stay tuned!